Mimi’s Mittens

I love opera!

Maybe I should qualify that – I love Italian opera…….

But please, don’t hold this against me – I just discovered at an impressionable age that opera has the ability to be ‘more than’.  Take any emotion you can think of: falling in love, falling out of love – pain, hurt, jealousy, broken heart, lost love, betrayal, death – and then multiply it by ten and you have the heights and depths of emotion the operatic aria can take you to.  It will wash you clean if you listen at just the right time in your life!

Of course you have to suspend any association with real life.  Very often when the voice is mature enough to sing the role, the singer is past the first flush of youth and most operatic leading characters are young and nubile …..  I remember seeing Pavarotti at his heaviest playing the the mighty Egyptian soldier Radames in Aida.  He stood stock still, centre stage, like a rotund statue while the entire cast moved about him.  But oh that voice!

In this day of filmed operatic singing it is hard to stay in the moment when chests are heaving and mouths are working overtime to get those notes out.  You have to so admire opera singers, they have to sing and emote at the same time.  It works much better when it is on the stage. The lighting, set and costumes – the vivid colour and acoustically perfect orchestra and soaring voices take over and the distance between you and the on-stage performance allows for the suspension of belief – one can be quite transported by the event.

Because of course the other thing about operas is the sets and costumes.  One should never simply listen to an opera – it is a feast for all the senses.  Rich in colour and grandeur and theatrical presence.  The orchestra and voices soar and mingle with the colour and movement – it is a sensory explosion.

Not everything about operas is good.  Many of the stories are just plain rubbish really. Sometimes the music misses the spot.  But, just like modern musicals, every opera has at least one ‘hit tune’.  And when aria and the emotion collide it is indeed a spectacular thing!

Even if you have never seen an opera and even if you have and say it’s not for you, I’m sure you will be familiar with these wonderful pieces.  Have a listen as you read on.

This is one of my favourites, a chorus from Puccini’s ‘Madama Butterfly’ – even if you know nothing about the story, you cannot help but be taken into the tragic denouement.

The Hebrew Slaves Chorus from Verdi’s ‘Nabucco’.  Can you hear the hopeless exhaustion throughout this hymn of loss for their beloved homeland?  From the opening ‘Va pensiero’ I am always caught, no matter who is singing.  I recommend biggifying this, and just enjoy –  it is great example of staging and emoting while singing……..

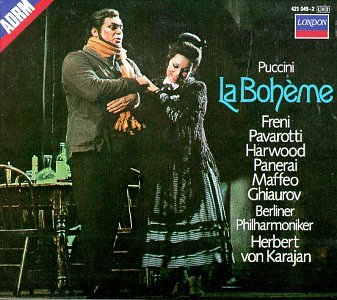
One of the most popular operas today is also, in many ways, [and purely in my opinion, you understand  – feel free to disagree] one of the worst operas of all time.  It’s another Puccini opera, ‘La Boheme’ and it is in part, truly terrible!  The plot is all over the place and some of the music is less than memorable.  But there is a lovely romantic story running through it and it has to be admitted, I love a good romantic tragedy!

The real story is about Rinaldo, the writer and Mimi, the delicate embroiderer who lives above him.  All the rest just tends to get in the way.  This is one of the versions I have on DVD……..

La Boheme 1

In much abbreviated form it is the story of some young students –  an artist a writer, a philosopher and a musician – all living in poverty in their garret quarters, hiding from the landlord because they can’t pay their rent.  It is Christmas Eve.  [Which reminds me, the modern musical ‘Rent’ is based on this opera.]

La Boheme 4

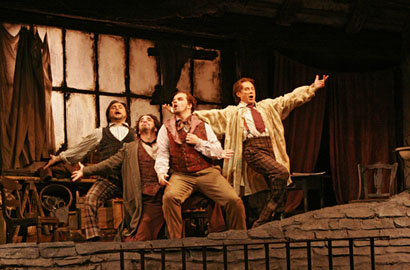
There is a knock on the door and Mimi enters.  Mimi is a neighbour living in the upstairs attic, a poor girl who embroiders flowers for a living.  Her candle has blown out and she has come seeking a light.  Subsequently she loses her key to her door. Rinaldo, the writer, goes with her to look for the lost key.  The sneaky beggars finds it and pockets it without Mimi seeing.  Moment later he is declaring his undying love.

La Boheme Villazon&Netrebko

They get together, then he ditches her claiming he can’t stand her cloying jealousy but confides in his friend he thinks their poor living conditions are making Mimi ill. [Why he thinks kicking her out will make her better is beyond me and just another hole in the story.]  Many scenes are out in the snow to ensure you get the ‘frozen’ message.  Mimi coughs dramatically whilst singing beautifully and with her last remaining strength comes to find her lover again.  She dies in his arms.  Despite all my cynicism I always shed a tear!

La Boheme 3

Now the upshot of all of this is that even though I dislike the story – just between you and me, I feel I could have written a much better version ……. when the music is good, it is very good – in fact touchingly beautiful.  This is why it is one of the most popular operas after all.   And I admit it is the romance, the bohemian lifestyle, the starving artist in a garret syndrome that has me in its thrall.  I am such a sucker for romance!  Did I say that already?  And bohemian artists in garrets …… sigh!

Here’s quite a good version of ‘La Boheme’ if you want to watch it

So when I had the opportunity to rescue some black fingerless gloves from the landfill because they were imperfectly finished or had minor faults and began to play around with them of course the very first thing that came to me was this aria from La Boheme ‘Che Gelida Manina’ loosely translated as ‘your tiny hand is frozen’ which Rinaldo sings to Mimi right off the bat!

I played around with colour and made Mimi many mittens so her hands would be forever warm.  To accompany the theme there are little darned patches in some of the gloves, whether the mitten needed it for real or not.  These are true bohemian mittens, colourful, different and ever so slightly well worn looking.

Pizap Mimi

pizap La Boheme

Mimi Handwarmers have flowers on the back.

La Boheme do not have flowers, they have a fancy ridge instead.

While the black gloves are made using acrylic yarn the additions are made with New Zealand wool or kid mohair.  Every pair is different because I make it up as I go along.

I am enjoying making them and enjoying knowing something has been saved from the landfill and given the chance of an appreciated and fun life on someones hand.  I am giving these mittens away.  There are six pairs of handwarmers.  However, I’m sorry to say, you do have to pay postage if you want to win a pair – my funds won’t run that far.

*New Zealand people postage is $NZ4.50

*The Rest of The World postage is $NZ10.00

*  If I find I can get it sent to you for less I shall reimburse the difference.

Here’s how it works:  If you wish to go in the draw you must be a follower of this blog and you must leave a comment.  And I would really like it if you would take the poll – please, take the poll….. [I’ve been blogging for two years, I just had my anniversary last week and this is my first poll and I would love your feedback!]

Also mention your first and second colour and style preferences in your comment.

Even if you don’t want a pair of fabulous Mimi Mittens you can still leave a comment – you know I love to hear from you –  I know bohemian isn’t everyone’s style!

At the end of the week I will draw names and publish the winners.  You will then have to contact me via the address on my ‘Contact Me’ page to make arrangements for the payment of your postage and to give me your address.

Here’s the poll:

I hope you enjoyed listening to some of the music on offer – Orlando is asking me to turn it off – he votes for Bruce Springsteen, he’s not a fan of opera and he loves the late, great Clarence’s sax – we usually have a bit of a dance ……

YGM6

Thanks for coming by today, I love that you did!

Box to Book – Finished and Given, At Last!

Cover finished 1 a

It took the better part of a year – but I got there and I am so happy and relieved to report to those of you who have so faithfully and patiently waded through posts and photos that it was well received.

These photos were taken late at night on my ED’s birthday after a long and full day of zooming halfway up the Island and back again and a rather scrumptious dinner of mussels and Belgian Beer at The Leuven in Wellington City………. On the phone to her right is YD, partaking long distance in the present opening and without the benefits of mussels and Belgian Beer!

present1

present3

Here once more is the history of the Book of Love to refresh memories.

For Christmas 2012 I received a Spellbinders die cutting machine from my lovely Eldest Daughter.  The box was a biggish, strong, brightly coloured affair that sat in my craft room for a couple of months with me looking at it and wondering what it could be used for.

At some point I had the bright idea it could and should be recycled into a book and given back to the giver of the gift the following Christmas.  I was inspired by a beautiful project I had seen on You Tube and also by thoughts of creating something that looked as if it was really old and well loved from ordinary crafting items.

I wanted to give my daughter something that featured my handwriting and lettering, something that could be opened at random and would hold an uplifting message or thought and something that could reveal, or unveil, more layers every time she looked at it.

I ended up deciding to make all my pages and inserts look like palimpsests and consequently spent many happy hours taking ordinary cream coloured card stock and wrinkling, ripping, stamping, dirtying, writing and shaping it to my requirements.  Whilst not strictly meeting the requirements of old parchment that has been recycled and written over many times, it made me feel happy and added depth and interest to the pages that appeared.

The box was roughly cut up into pieces the same size and covered with papers.  Little pieces of the original box however can be seen here and there so the provenance is not altogether lost. I wonder if you spy any of those odd edges and corners as you go through?

The project took longer to complete than expected – mainly due to me getting back into mixed media painting and opening an Etsy Shop and wasn’t ready for last Christmas – but I was determined to get it completed for ED’s birthday last Saturday.  I made it by the skin of my teeth!

We made a little video of the book before I left to come home with my rattly little camera – it is a bit shaky and ends rather abruptly due to me not knowing how to do fade-outs and such like – but may show some aspects that are harder to see in the photos.  Please forgive the quality.

Here we go – I hope you enjoy  🙂

bday1


bday2 bday3 bday4 bday5 bday6 bday7 bday8 bday9 bday10

The eagle eyed amongst you may notice that I’ve somehow lost a photo here – a page is missing.


bday13

bday11


I had a wonderful week away, we were so busy and so happy and it went by in  flash – and I took almost no photos – completely hopeless!

But here is a photo of Wellington Airport for you Lord of The Rings and Hobbit fans:

Middle-Earth-Airport-Wellington

Thanks for coming by today – I’m so happy that you did!   🙂

Gift Bags from Newspaper

I love to recycle and re-purpose – if I can figure out a way to make something that would normally be trashed into something useful or beautiful – or both – I’m up for the challenge.

I’ve been thinking about this project for a while now and finally committed myself to actually having a go.  It came about this way…..

Do you remember I made a bunch of small gift bags a while back.  I wanted to make some really big ones, you know, the size of a good shopping bag and I had figured I would need six 12 x 12 sheets per bag.  Using quality specialist paper would have made the cost prohibitive – I mean $24 just for the paper and I haven’t even put the time in yet …. you can buy big gift bags at the moment for $2.50…..

With my creative mojo firing on all cylinders I had the genius idea I could make them from newspaper – the big giant ones.

I used the Otago Daily Times that I stole from YD’s place when I was cat-sitting the lovely Stanley.  [I stole it for this purpose, I don’t read papers – they rarely have anything good or uplifting in them and I don’t want to live with images of all the horrible stuff that the media calls ‘news’]

An open double page measures 80 x 57 cm – I’m sorry I can’t convert that off the top of my head for you non-metric folk…… perhaps someone else might in the comments 🙂  Anyhow, it’s big!

So a couple of evenings back, I covered the floor with more bits of newspaper and hunkered down with a container full of blood red poster paint, a brush and a water jar:

XmasBag1

I painted two double page spreads with a thick layer of paint and left them to dry overnight.

The next day I turned the paper over and ran wrestled a length of contact paper over the page.  [Contact paper is used to cover books and shelves – sticky on one side and a plasticky / wipeable finish on the other.]  I used this to give the newspaper some strength and durability.

XmasBag2

I worked out my score lines for width and depth and top and bottom ……. ooooh headaches!!

And made a pair of bags:

XmasBag3

I like that you can still see the newsprint showing through – but the photo is not true to the red I used – think blood red and you’ll be closer to the truth of it.

With the basic bag hanging together quite well it is embellishment time – Hurrah!!

I rummaged through my paper stash and found a 12 x 12 vintage collection that I purchased in a sale a year or two back and have never known what to do with – I chose two different pictures and roughly cut out around the images and stuck one on each bag.

XmasBag5

Using white, black and gold pens I highlighted the edges of the cut outs, faux stitched outside the edges and outlined different aspects of the woman.

Lace was hot glued all around the top edges and red organza ribbon employed for the handles

XmasBag6

Next I punched out some hearts using off-cuts from the vintage girl paper and shiny metallic gold and layered some:

XmasBags4

And stuck ’em on both the front XmasBag5a

and the back of the bags

XmasBag7

The hearts were given faux stitching in black pen.

So, looking good you say – finished?

Nope.  Remember, if a little embellishment is good, a lot is better…

XmasBagDetail

The fabric flowers are made from organza and curtain netting – great fun to make as it involves a lighted candle and charring melting ….. 🙂

The beaded flowers I learnt to make from someone on the internet two or three years ago and I’ve completely forgotten who it was – but they too are fun to make.  It’s just beads and twisted wire and they hang freely and move about which adds another layer to the whole thing.

I think they are finished – but there is still three weeks til Christmas, you never know what might happen to them between now and then…..

GiftBag Finished

I think they came out quite well for a first try  – I learned lots and know how to do it now….

Thanks for coming by today – I love that you did 🙂

Recycled Packaging Box

Hello Friends!

If you’re someone who has been following my posts for a while, you may remember how keen I am on being able to recycle stuff – especially packaging.  And then, in my last post, I told you how I spoiled myself a little and purchased a host of paints, pastels, crayons, pencils, charcoals and pens for my budding artistic endeavours…….

They arrived in two identical sturdy boxes like this:

Packing Box 1

The boxes have substance, being made of corrugated card laid between the two outer sheets of cardboard and measure 305 x 165 mm.  Which, to my way of thinking, is a size that just has to be useful.

So, yesterday afternoon I said to Orlando, ‘Come, let the ‘repurposing’ begin!’ and off we went to the play room.  I got out the silver ultra-sticky plumbers tape that I picked up on a visit to the local DIY store years ago and which is an ever-so-handy member of my adhesives drawer, a pair of scissors and the tacky glue.  I rummaged through the paper stash and found the left overs from the ‘Le Tres Chic’  30 x 30 papers from DCWV.  The size of these sheets was pretty spot on,  so even though the colours don’t exactly sing to me I figured this is a trial run to see what I can do, so let’s use ’em!

And this is what I did:

Packing Box 2

I ran the plumbers tape all around the edges and along the creases where the box folded  over into its top.  This was for extra strength, protection and because I didn’t want to try wrapping paper around a slightly wonky edged cardboard box.

I cut the paper just short of the box edges and adhered it with the tacky glue.

I did the inside too:

Packing Box 3

Voila!  A new home for my art journals, sketch book and note books

Packing Box 4

And here they are, proud as punch, sitting in the morning sun on Orlando’s table.

Packing Box 5

All up it took me about 40 minutes to make, so I shall probably put the other one together this evening.

Recycling and repurposing is very satisfying!

Thanks for coming by, it’s always lovely to know you’ve been 🙂

Toilet Paper Rolls, Lace and Pearls

If you take a brief stroll around pinterest you will inevitably come across some clever, ingenious idea for using empty toilet paper rolls – I keep thinking I should start a board and just collect them all!  Anyway, I got the idea for this project from pinterest.

With my latest hobby of doodling and zentangling joining in with journalling and sketching, it has become obvious I need to have a more mobile storage system for pens, pencils and assorted paraphenalia – I can then just doodle, journal or sketch away happily here, there or anywhere without constantly going looking for something I have decided I need.

Now, serendipitously [is that a word?], it happened that I had sitting in my craft room a disused cutlery basket dating back to at least the early nineties but possibly earlier – I have a vague recollection of purchasing it when I lived in the UK – it has wandered around the world with me since then, mostly unused but too nice to give away – you know one of those things that you keep thinking will come in handy one day…..

One day it and a toilet paper roll or two met up and voila – inspiration struck!

Last night I got out the paint

TP1

I painted inside and out and when they were dry I used an unmounted red rubber lace stamp and white acrylic paint [which I forgot to photograph] and gussied them up a bit.  When the paint was dry each roll got a coat of glossy mod-podge and as it was well after midnight and Orlando was crossly telling me he needed me to settle down so he could sleep on me, I went to bed!

This evening I decided some of them needed some pearls to pretty ’em up a trifle more as they would be centre and front stage

TP2

Ready for their [slightly blurry] close-up

TP3

And the finished very handy mobile carry all

TP5

TP4

There are currently two mugs being utilised in there as well.  They will probably be replaced by re-purposed cans, just as soon as I can eat the foodstuff currently residing in them ….

So that was a fun way to spend a grey, wet weekend!

Earthquake post script for those who are interested:  There have been only two or three ‘strong’ quakes today, so it is quieter [which may or may not be a good thing]  Some say Full Moon is a likely time for big hits. Time will tell.

Thanks for dropping by, I hope your week will be a fabulous one!  🙂

The Paper Bag Book

Bag & Book

I decided to make the little book for several reasons –

1) it was originally meant to be included in the ‘Box to Book’ project, but just wanted to be too big for its intended slot – so it became a stand alone piece.

2)  I wanted to experiment with more aged and tattered looks, I wanted to make a little book that looked as if it had been well loved for a long time.

3) I’d been reading about the importance of leaving behind examples of your own writing for your loved ones – and remembering how touched I had been when I discovered words handwritten by beloved old relatives, now gone.   I thought I should make something that was written in my own hand.   I started it in the ‘Box to Book’ project, and continued it here.

4) My recycling bug needed to make use of some cardboard and paper bags and used dryer sheets that were lying about on the desk getting in my way…

So, here we go.  The first pic depicts some of the items used in the process of turning a bit of cardboard and a brown paper bag into a faux leather book cover, assembled around the almost finished book:

Booklet 1

I cut the cardboard into two pieces.  The brown paper was cut to size, crumpled up and generally mistreated.  Then it was hit with swipes of ink straight from the ink pad in two colours – my favourites at the moment, Aged Mahogany and Old Paper.  The two pieces of card were then joined with binding tape, leaving a small gap so that the signatures could be sewn in

Booklet 2

The inside of the cover recycled a used dryer sheet, which has a really nice texture, like old hand made paper –  liberally sprayed with a glimmer mist concoction of colours:

Booklet 3

The almost finished cover – before the tweaking process:

Cover

The pages were made from ordinary white paper, cut to size, tattered along the edges to look like the hand cut paper you used to see in old books and generally mistreated to achieve that well worn look……. I wanted to get something of the look of a palimpsest* to the thing [don’t ask me why, it was just another crazy idea….] so I stamped every page with an illegible handwritten stamp from La Blanche in Old Paper, coloured over it with a coat of Aged Mahogany and then  splattered drops of Old Paper in liquid form about, made a coffee cup sized stain on some pages and dog-eared others.  I then hand copied a poem or a quote on every page.Booklet 5

The pages looked too plain for my taste, so now the flower stamp you saw in the first photo was utilised on every page and I spent a couple of happy hours colouring in and producing ‘water colours’ .  Still not satisfied I hit every page with a good spray of gold glimmer mist for a bit of sparkle.

Cover Inside 1

Page 2

Page 1

Detail

Detail

Byron & Yeats

The little book looks suitably well worn, with coffee stains, age spots and the glimmer of worn gold still visible on some pages.  It’s tatty and dog eared pages contain a wide variety of quotes and poems – from Winnie the Pooh to Khalil Gibran; Rumi to Leonard Cohen and includes Elizabeth Barrett Browning, Shakespeare, Yeats, Byron and more.  It’s all about LOVE!

With the book all but finished [tweaking!] I turned my mind to the bag.  I opened up another brown paper bag and cut it into two, then stuck it back together again.  I crumpled it up and mistreated it in a similar fashion to the paper that made the cover of the book.  I glued down the medallion and gave it a good coat of multi medium gel for shine and strength and [hopefully] durability

Bag w gel

At this point I realised I’d stuck the medallion on the wrong side of the bag and would have to disguise the rather prominent hem, which you can see at the top of the picture ….. so out came the lace and the ribbon and pearls and hot glue gun…… and we ended up with this.

Bag 4 finished

And did you spot the button?  It is one from the set that was made a few weeks back which I posted about as ‘Antique Buttons’.

I had fun making this and learned a lot in the process!

Thanks for dropping by, hope you enjoyed it – do say Hi – it’s nice to meet the visitors!  🙂

*Palimpsest literally means ‘scraped clean and used again’ 

Back in ye olde dayes when few knew how to write and paper/parchment was hard to come by it was common practise to scrape away previous script and use the paper again.  It was still common practise in the early medieval period for monks [who did most of the beautiful script work that survives today] to re-use even older manuscripts considered of no importance to produce their work on.  A recent discovery is the Archimedes Palimpsest.  It has caused great interest when it was found that the original writing was a 10th Century copy of a previously unknown treatise  by the renown philosopher.  Scientists and scholars are still working together to try and decode it. 

Box To Book – Part 2

I haven’t spent as much time on my recycling project as planned…… we are experiencing our first mild frosts of the season and the days that follow are beautiful, sunny and warm and they call Orlando and me outside.  We sit in the courtyard with our faces turned up to the sky and, smiling slightly, enjoy the warmth and the feeling of warm air on our skin or fur….. we both sometimes purr……

But I have done some work.  I’ve begun the process of sorting out embellishments I would like to add, finding just the right poem scraps and verses to include [which simply takes forever, there are so many] and making the extra fancy bits.

I had completed the first fancy pocket before realising I had not recorded the process – duh!! So I made some more and here is a small sampling of a couple of things where I had employed the camera:

The raw materials, cream cardstock and dies

The raw materials, cream cardstock and dies

These are two of my favourite dies – the lacy corner is from Heartfelt Creations and the open book is a Marianne die.

Because I am going to use those lacy corners as pockets I glued them onto clear rigid plastic [recycling the packaging that everything comes in these days] with multi medium gloss gel – that is the milky white that is showing up in the photos as it was still wet at photo call time.  Disappears when dry, so at first glance the pockets will appear transparent but will not rip when other items are placed into them……… Prior to this I had painted, inked, embossed them and then screwed them up to get a really well worn look.

Ready for their new home

Ready for their new home

I want to write in tiny text a little poem in the book ….. not sure what yet.

One page almost complete

One page almost complete

Still got a long way to go.  Thanks for checking in, leave a comment and let me know what you think – love to hear from you! 🙂