
I have read these words many times, this is the first time I have heard them – this bears thinking about!

The Old Chair
While preparing items for my Etsy shop I happened upon a selection of photographs of an old chair, tucked away in a folder resting on my ‘Might Be Useful One Day’ shelf.

Isn’t it great?
Now before you get all excited and think to yourself ‘My, that girl sure can take a good photo – what has she been wittering on about?’ – or words to that effect …… I must give you the full story.
[And if you are a new reader, the back story is that I do not take good photographs, either side of the camera.]
Once upon a time, in a previous life, I spent a portion of my week in a beautiful Botanic Garden, where I oversaw the training of some young people who were learning how to be successfully employed. One of my programmes employed them as trainee groundsmen where they learned gardening skills as well as employment skills..
The kids took their ‘smoko’ breaks outside an old tractor shed and one or the other could be found often perched on an elegant old chair that had once been beautiful, but was now tired and battered, neglected and forlorn.
Waiting for my young charges and their supervisor to appear for their weekly debriefing, I used to look at that chair and wish I had found it earlier, before it was past saving. I imagined it reupholstered and painted in a shabby chic style – I imagined it sitting proudly in a corner of my room – and then my hurly-burly loud and grubby gardeners would hurtle around the corner.
“‘Sup, Pauline” they would greet me and one or the other would flop into the old chair and my attention would shift.
One sunny morning I was waiting for my boys. It was quiet, the sun was making patterns on the concrete retaining wall and in the light the chair was looking determinedly colourful and cheerful. Someone had left a bucket filled with geranium cuttings on a potting bench beside the shed door and the looped hose was dripping water onto the gravel beside the table.
I lifted the bucket of cuttings down to the ground, beside the old chair and stood back, looking at. I moved the chair straighter against the wall and tidied up the hose.
I made a phone call to my friend and colleague up in her office, high above the old shed.
I moved the bucket again, turning it until I had the best of the geraniums showing.
As I finished my friend arrived huffing and puffing around the corner, camera in hand.
She was, and is, an enthusiastic and naturally talented photographer who always had her camera by her side. I waved my hand at the chair and the bucket.
“Really?” she said
Then she looked again “Oh” she said and put the camera to her eye and clicked a few shots in rapid succession, just as the boys came hurtling round the corner.
“‘Sup Pauline” they chorused. “‘Sup Barbara” and the chair and the bucket of geraniums disappeared behind their large and energetic frames.
Later that day my email bore a couple of shots of the old chair.
At the time I was doing a course in Photoshop and spent a happy hour with my instructor playing with the photos to get different effects. He did most of the work, and I couldn’t tell you where to start now, it has all been forgotten.
But I still have the Old Chair saved in my photograph file and the existing printed copies have now been made into cards for my Etsy shop.
From an original photograph, styled by the Contented Crafter 🙂


There are more versions, but you’ll have to visit the shop.
It opens on Thursday, I hope to see you there!
Don’t forget the giveaway, leave a comment on the previous post if you want to enter, it closes on the 14th.
Thanks for coming by today, I’m so happy that you did 🙂
Share this:

Be A Butterfly
Hello my lovelies!
I have been quite busy this past week – I took a leap of faith and decided to go for the Etsy shop thing – sooner than I had originally thought I might. This decision was in no small way brought about due to the ongoing encouragement and support from my blogging pals – none of whom I personally know, but all of whom I feel I really know!
I cannot say enough about those of you who consistently visit and leave comments and words of encouragement. I work mostly in isolation and your feedback has been pivotal in keeping me on task and determined to grow as an artist [chuckle – it still makes me smile…]
So to those loving, caring, loyal, helpful, beautiful gals – big, big hugs, tons of love and an unspeakable amount of gratitude zipping out from here to you!!
To celebrate the opening of said shop ‘The Contented Crafter’ – of course, what else – I painted a small mixed media canvas featuring a faery girl and butterflies. She will be the first original mixed media canvas in the shop:

This is a smallish exhibition canvas – just under 20 cm square x 3.5 cm deep [8 x 8 x 11/2″] Worked in acrylics with water and ink pens, stamps and glitter. [You’ve gotta have some bling!]
There will also be larger limited edition prints and blank all purpose greeting cards of this faery girl in my Etsy shop.
To celebrate the opening of my new creative venture I am giving away the first numbered and signed limited edition print of this canvas to a randomly chosen commentor on this post. You have until the 13th to comment.
The draw will take place on the 14th November, which is also the same day The Contented Crafter Etsy shop will go live 🙂 [Ooooh, exciting!]
All commenters names will be written on slips of paper and placed in a randomly selected kitchen container and the winner’s name will then be selected by someone who is not me.
So dear readers, I hope you like her and want to take a punt. 🙂
Share this:

‘I’m the One’ Mixed Media Canvas
Hello my friends! The sun is shining, the flowers are blooming and the paintings are coming along quite nicely … Hurrah!
Here is the latest 30 x 30 cm canvas:
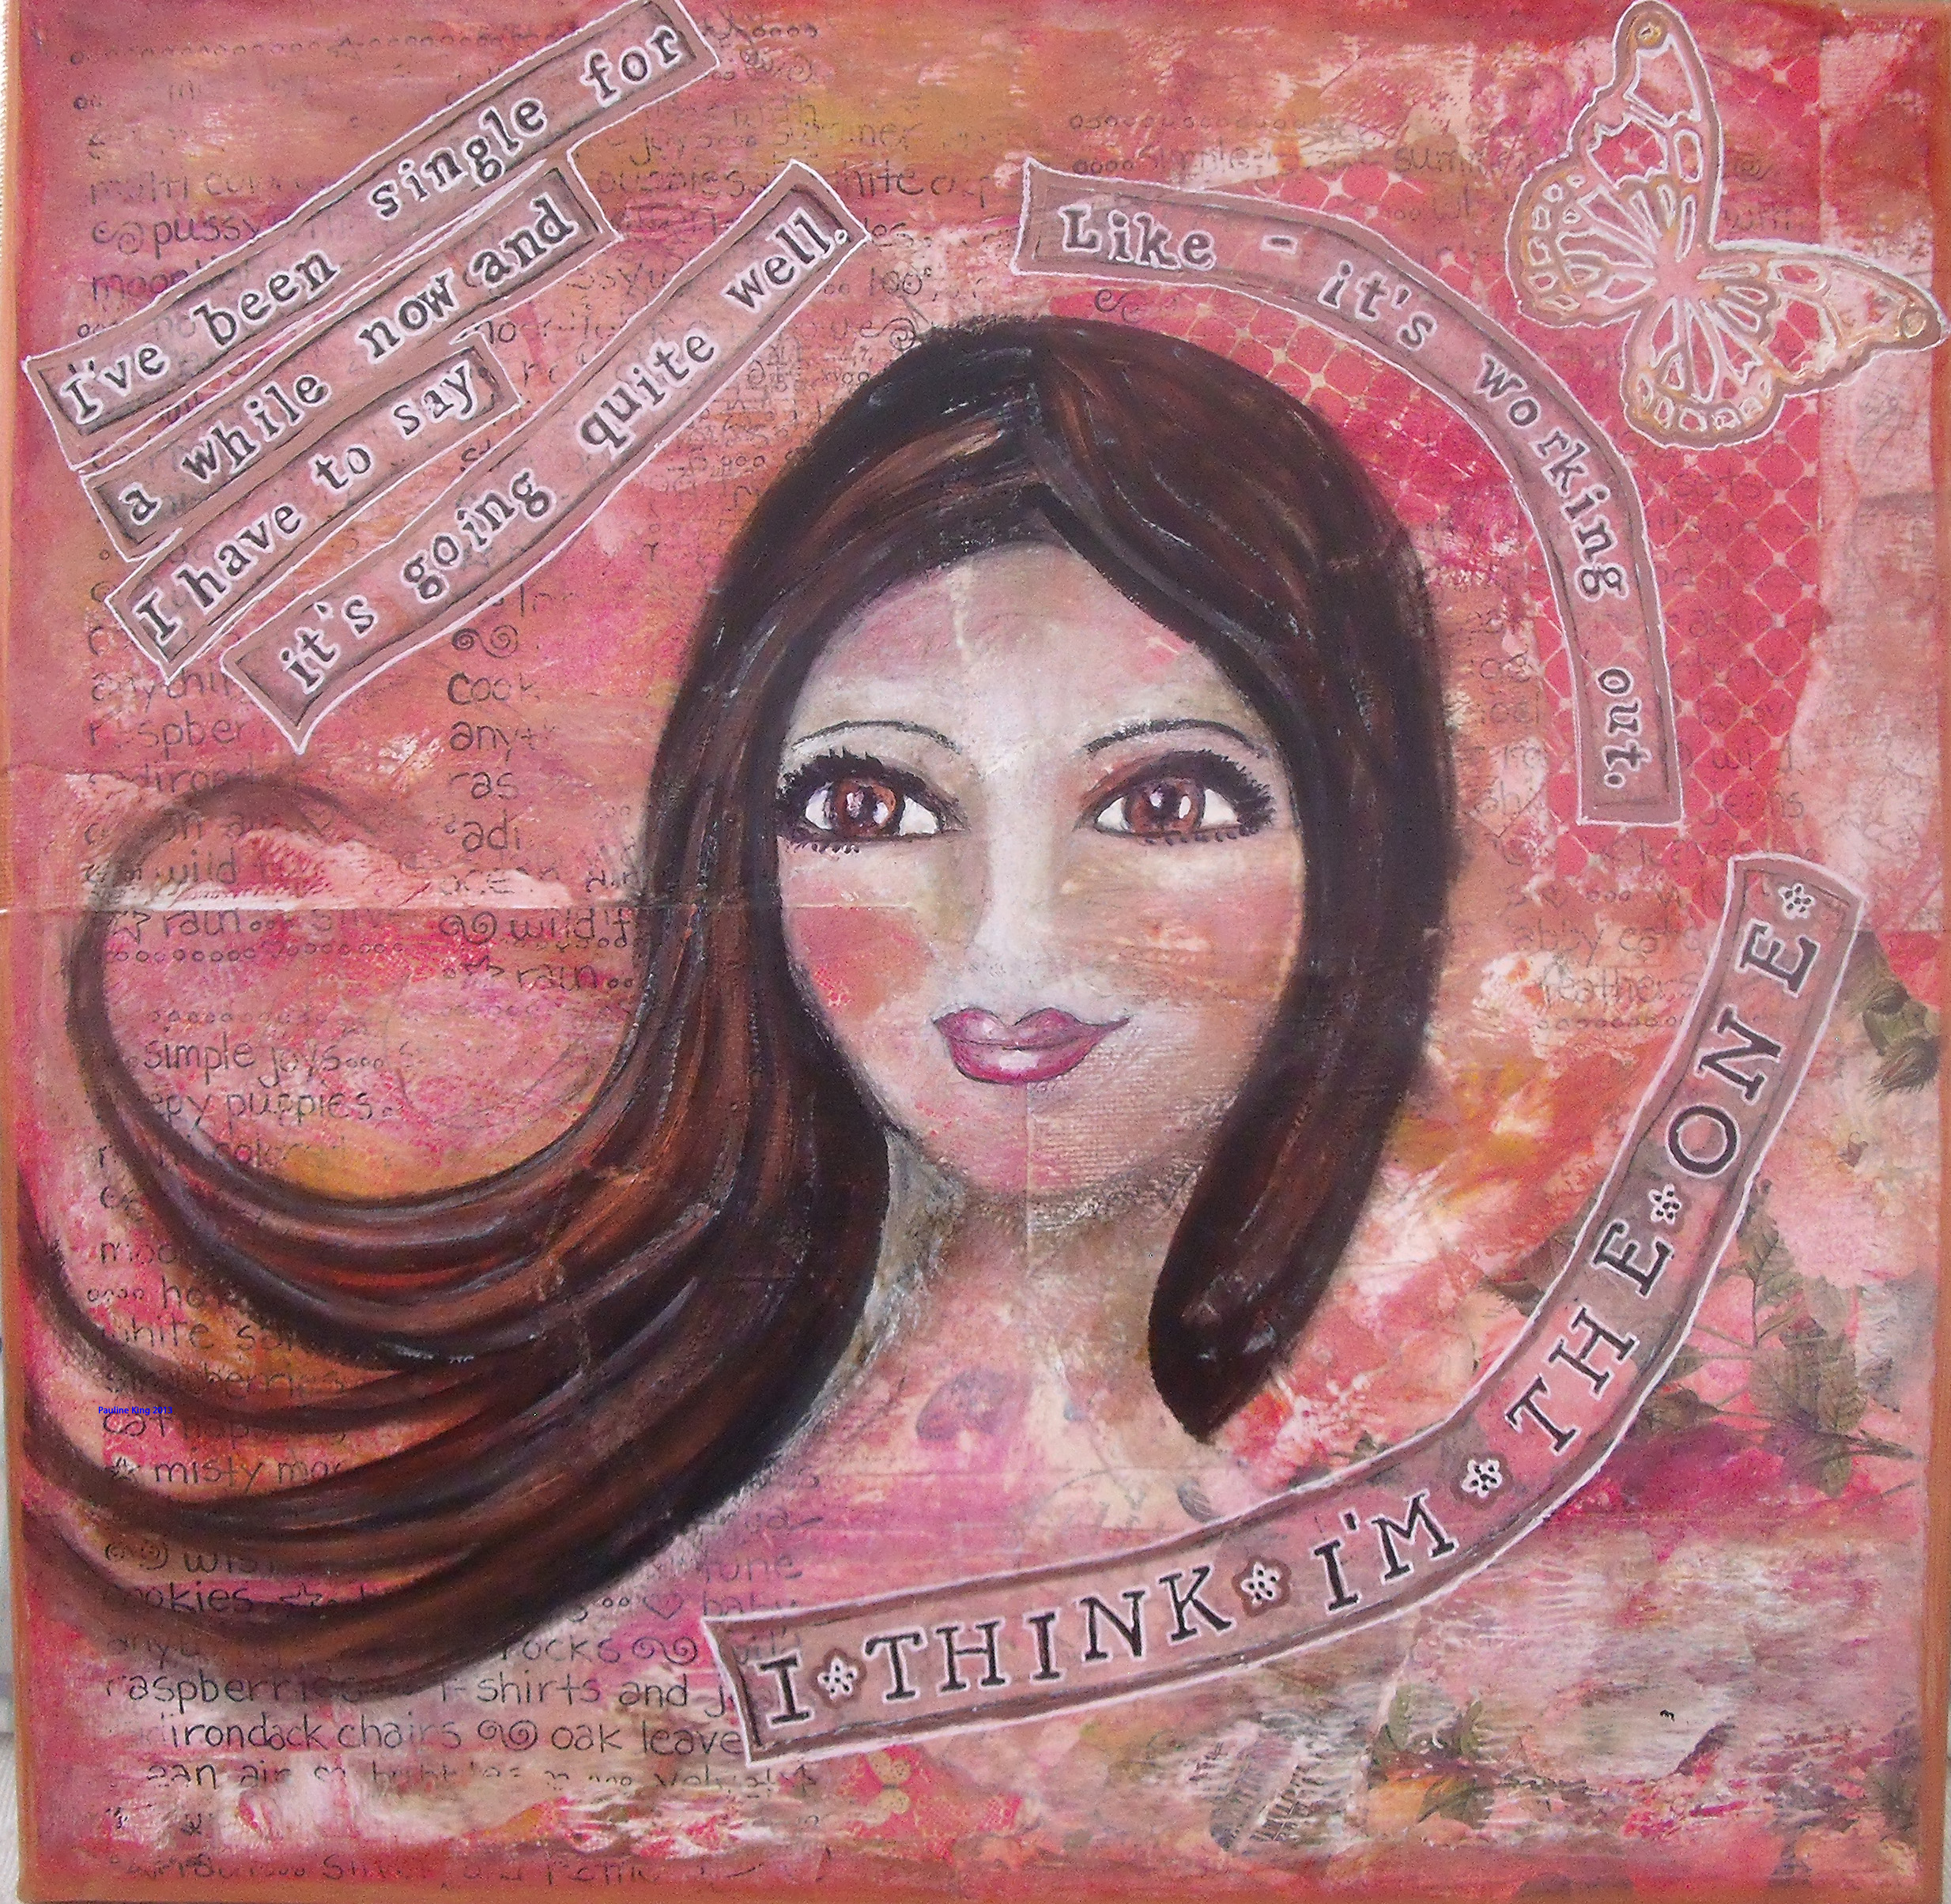
This has been created especially for someone very close to me.
The message, while humorous, also has a serious intent. Even when that special someone comes into your life it is important not to lose yourself.
Do you agree?
Thanks for dropping in today, I love that you did! 🙂
Share this:

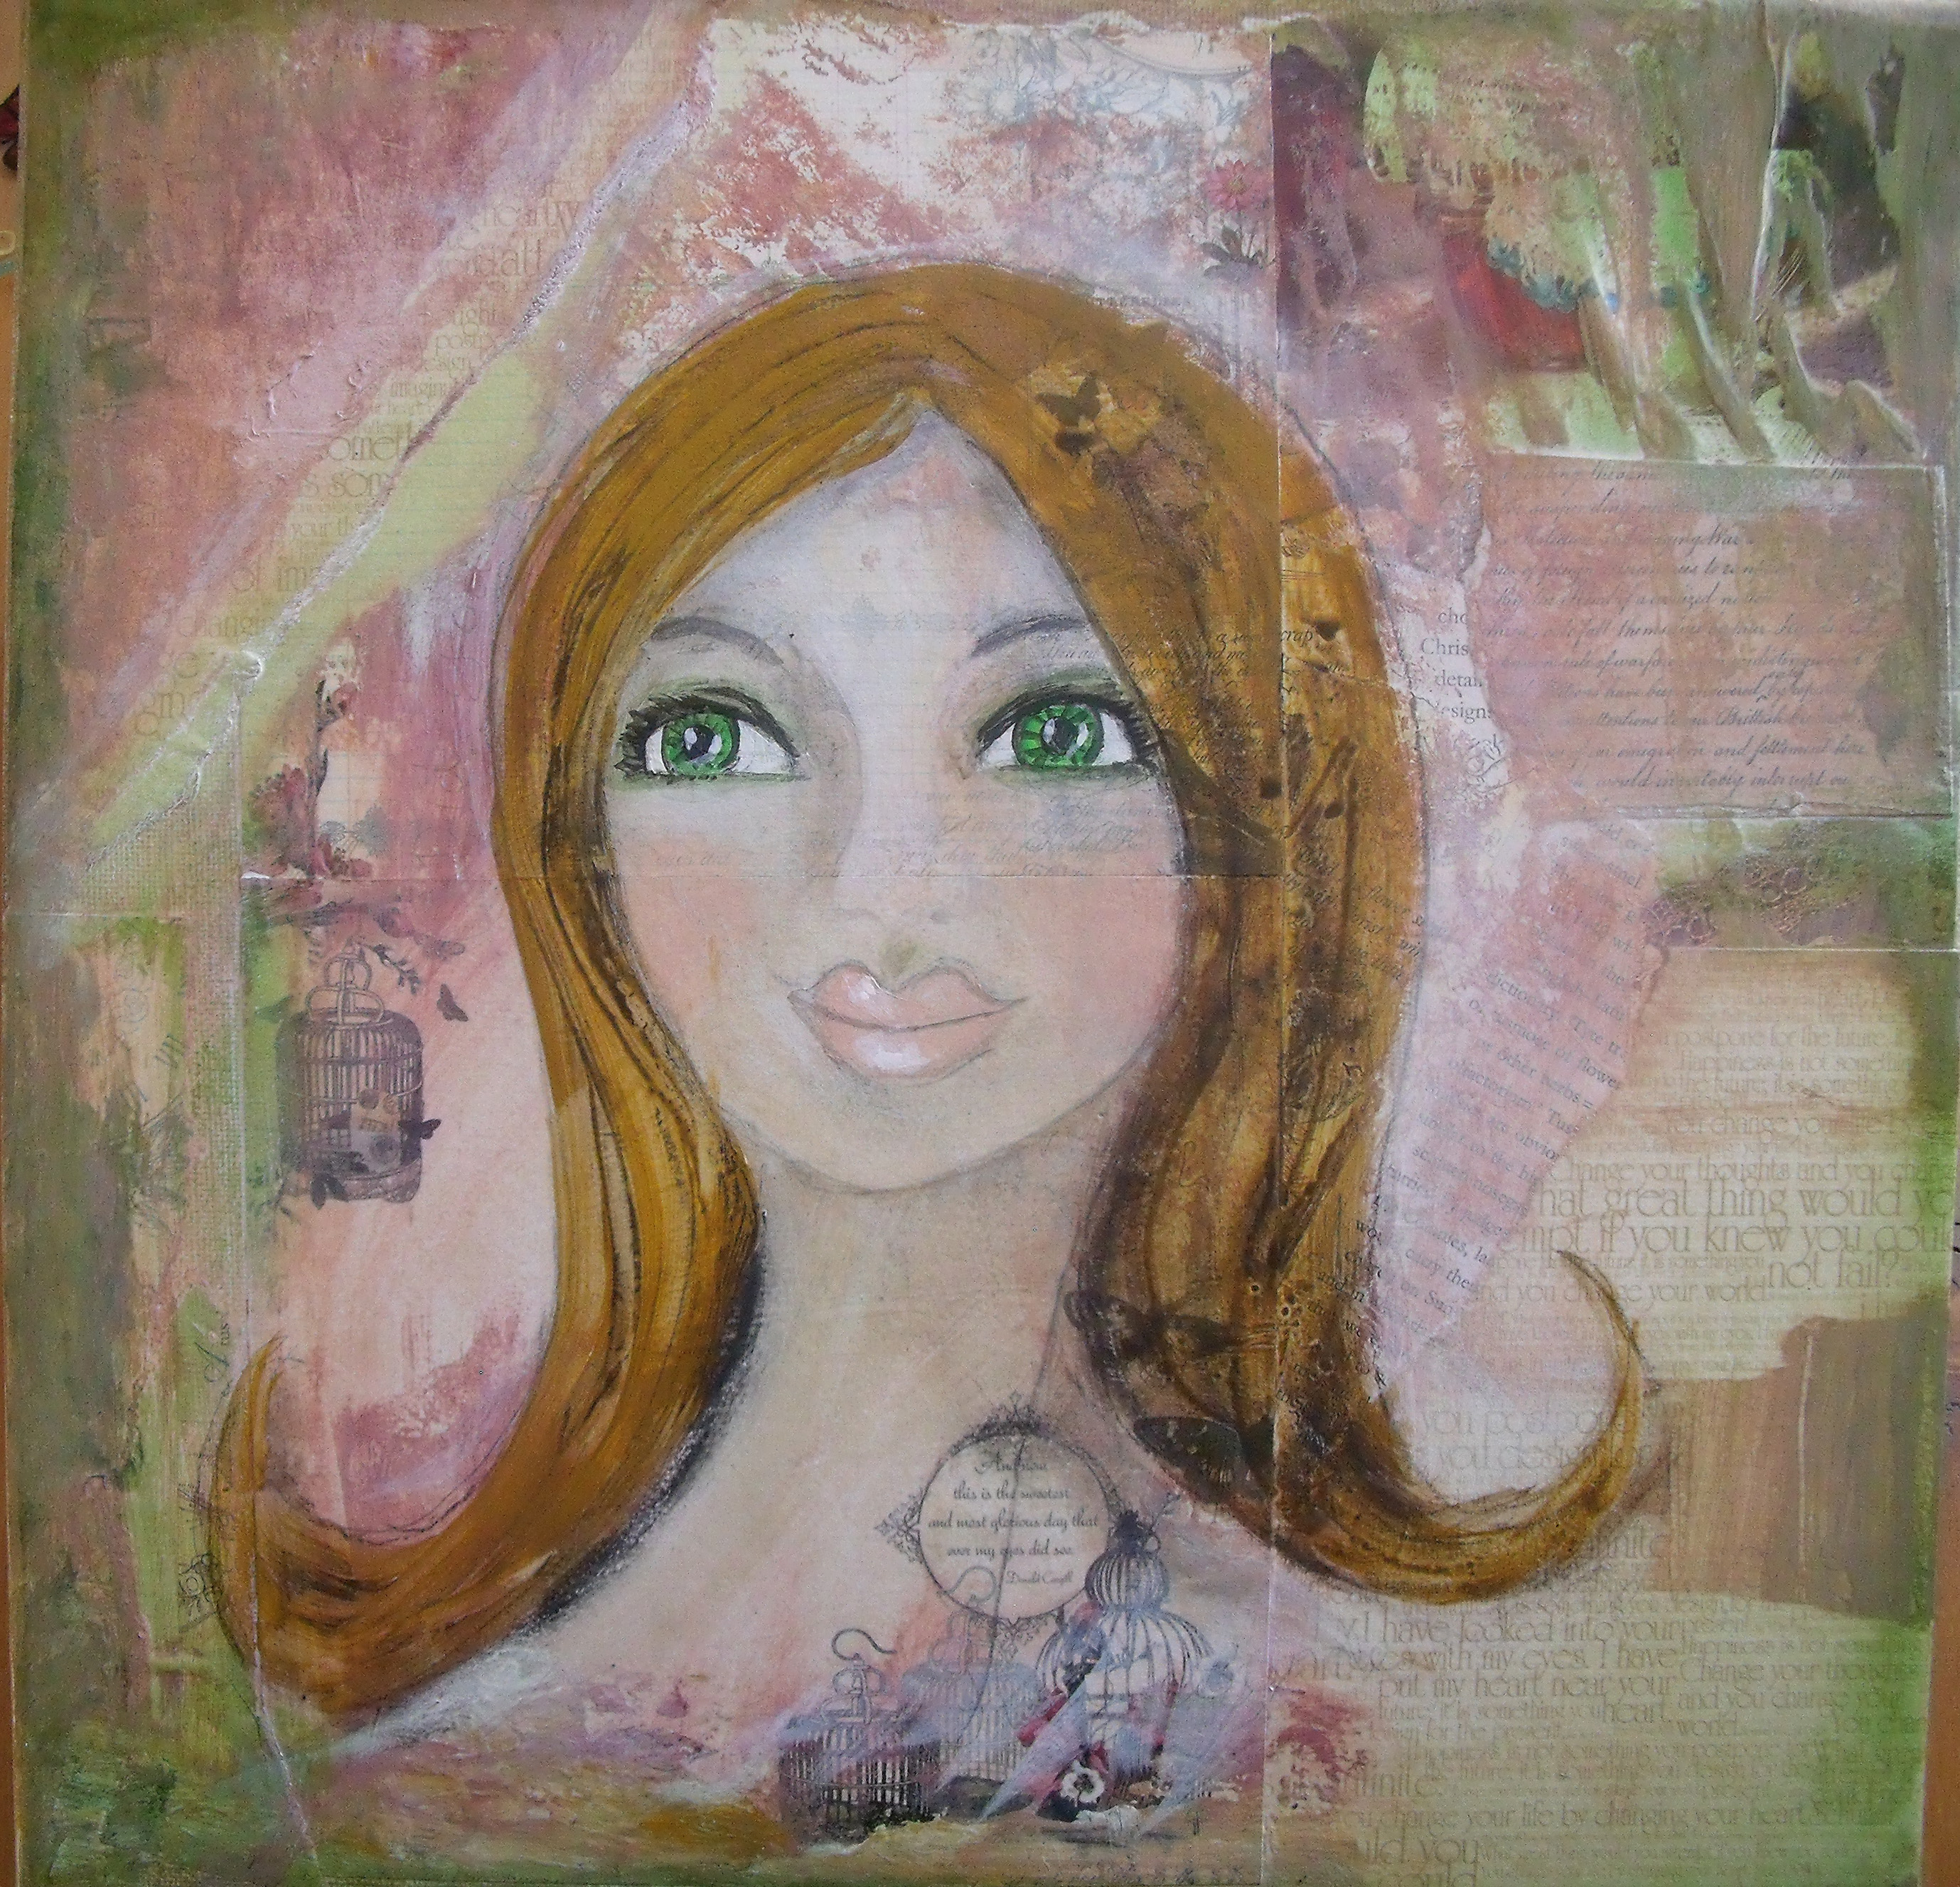
Mixed Media Canvas
After two weeks of making flowers and cards and occasionally battling with my first canvas in over six years – WE HAVE LIFT OFF!
The first big breakthrough came when I could finally admit I had bitten off more than I could chew and that it actually was okay to walk away from it …….. that took ten days to get to.
I had rashly committed to a canvas measuring 600 x 500 mm [23 1/2 x 19 1/2″] – it seemed quite small at the time considering that I routinely painted on 1000 x 800 mm back in the day….
What I was not considering was that I had changed mediums and styles – I used to work with acrylics and the odd bit of charcoal and pen and create giant imaginary land and seascapes – this would be my first canvas as a ‘multi-medium artist’ [Oh, giggle – it makes me so happy to think I might be an ‘artist’…. 🙂 ] Up until now when mixing my mediums, I had worked in my journal and on card size pieces only.
Having purchased and read Kelly Rae Roberts marvalous book ‘Taking Flight‘ and having checked out Willowing [Tamara Laporte’s] work on You Tube, I felt ready to give this thing a proper go……
Yesterday I got out a small canvas 300mm sq [11 1/2″] and set about collaging in the background. I used mostly ‘Websters Pages’ and added in some text from old books.
I painted over the whole thing with a brayer, removed some colour and added green distress inks around the edges of the torn pages and the edge of the canvas.
I sketched in the face and coloured it lightly with some distress inks:

…..and went to bed.
This morning I worked on it some more:
My confidence grew as I avoided all the idiotic pitfalls I could have fallen into and I didn’t screw up too badly….
So of course I kept at it- adding in Lumiere ‘True Gold’ around the sides of the canvas and pulling it into the front of the canvas as opportunity presented itself. I highlighted raised bits and edges of torn paper too. And if a little is good, more is better – right? I added gold highlights to her hair so it glimmers in the light – too much?
Finally I edged and highlighted with black charcoal:

Time to stop – so, of course, I kept going….
I added in the legend for that special someone and then the butterflies.
Here is the finished canvas:

I’ve chopped 2 – 3 cm off the top of the canvas somehow when taking the photo….. but you get the idea.
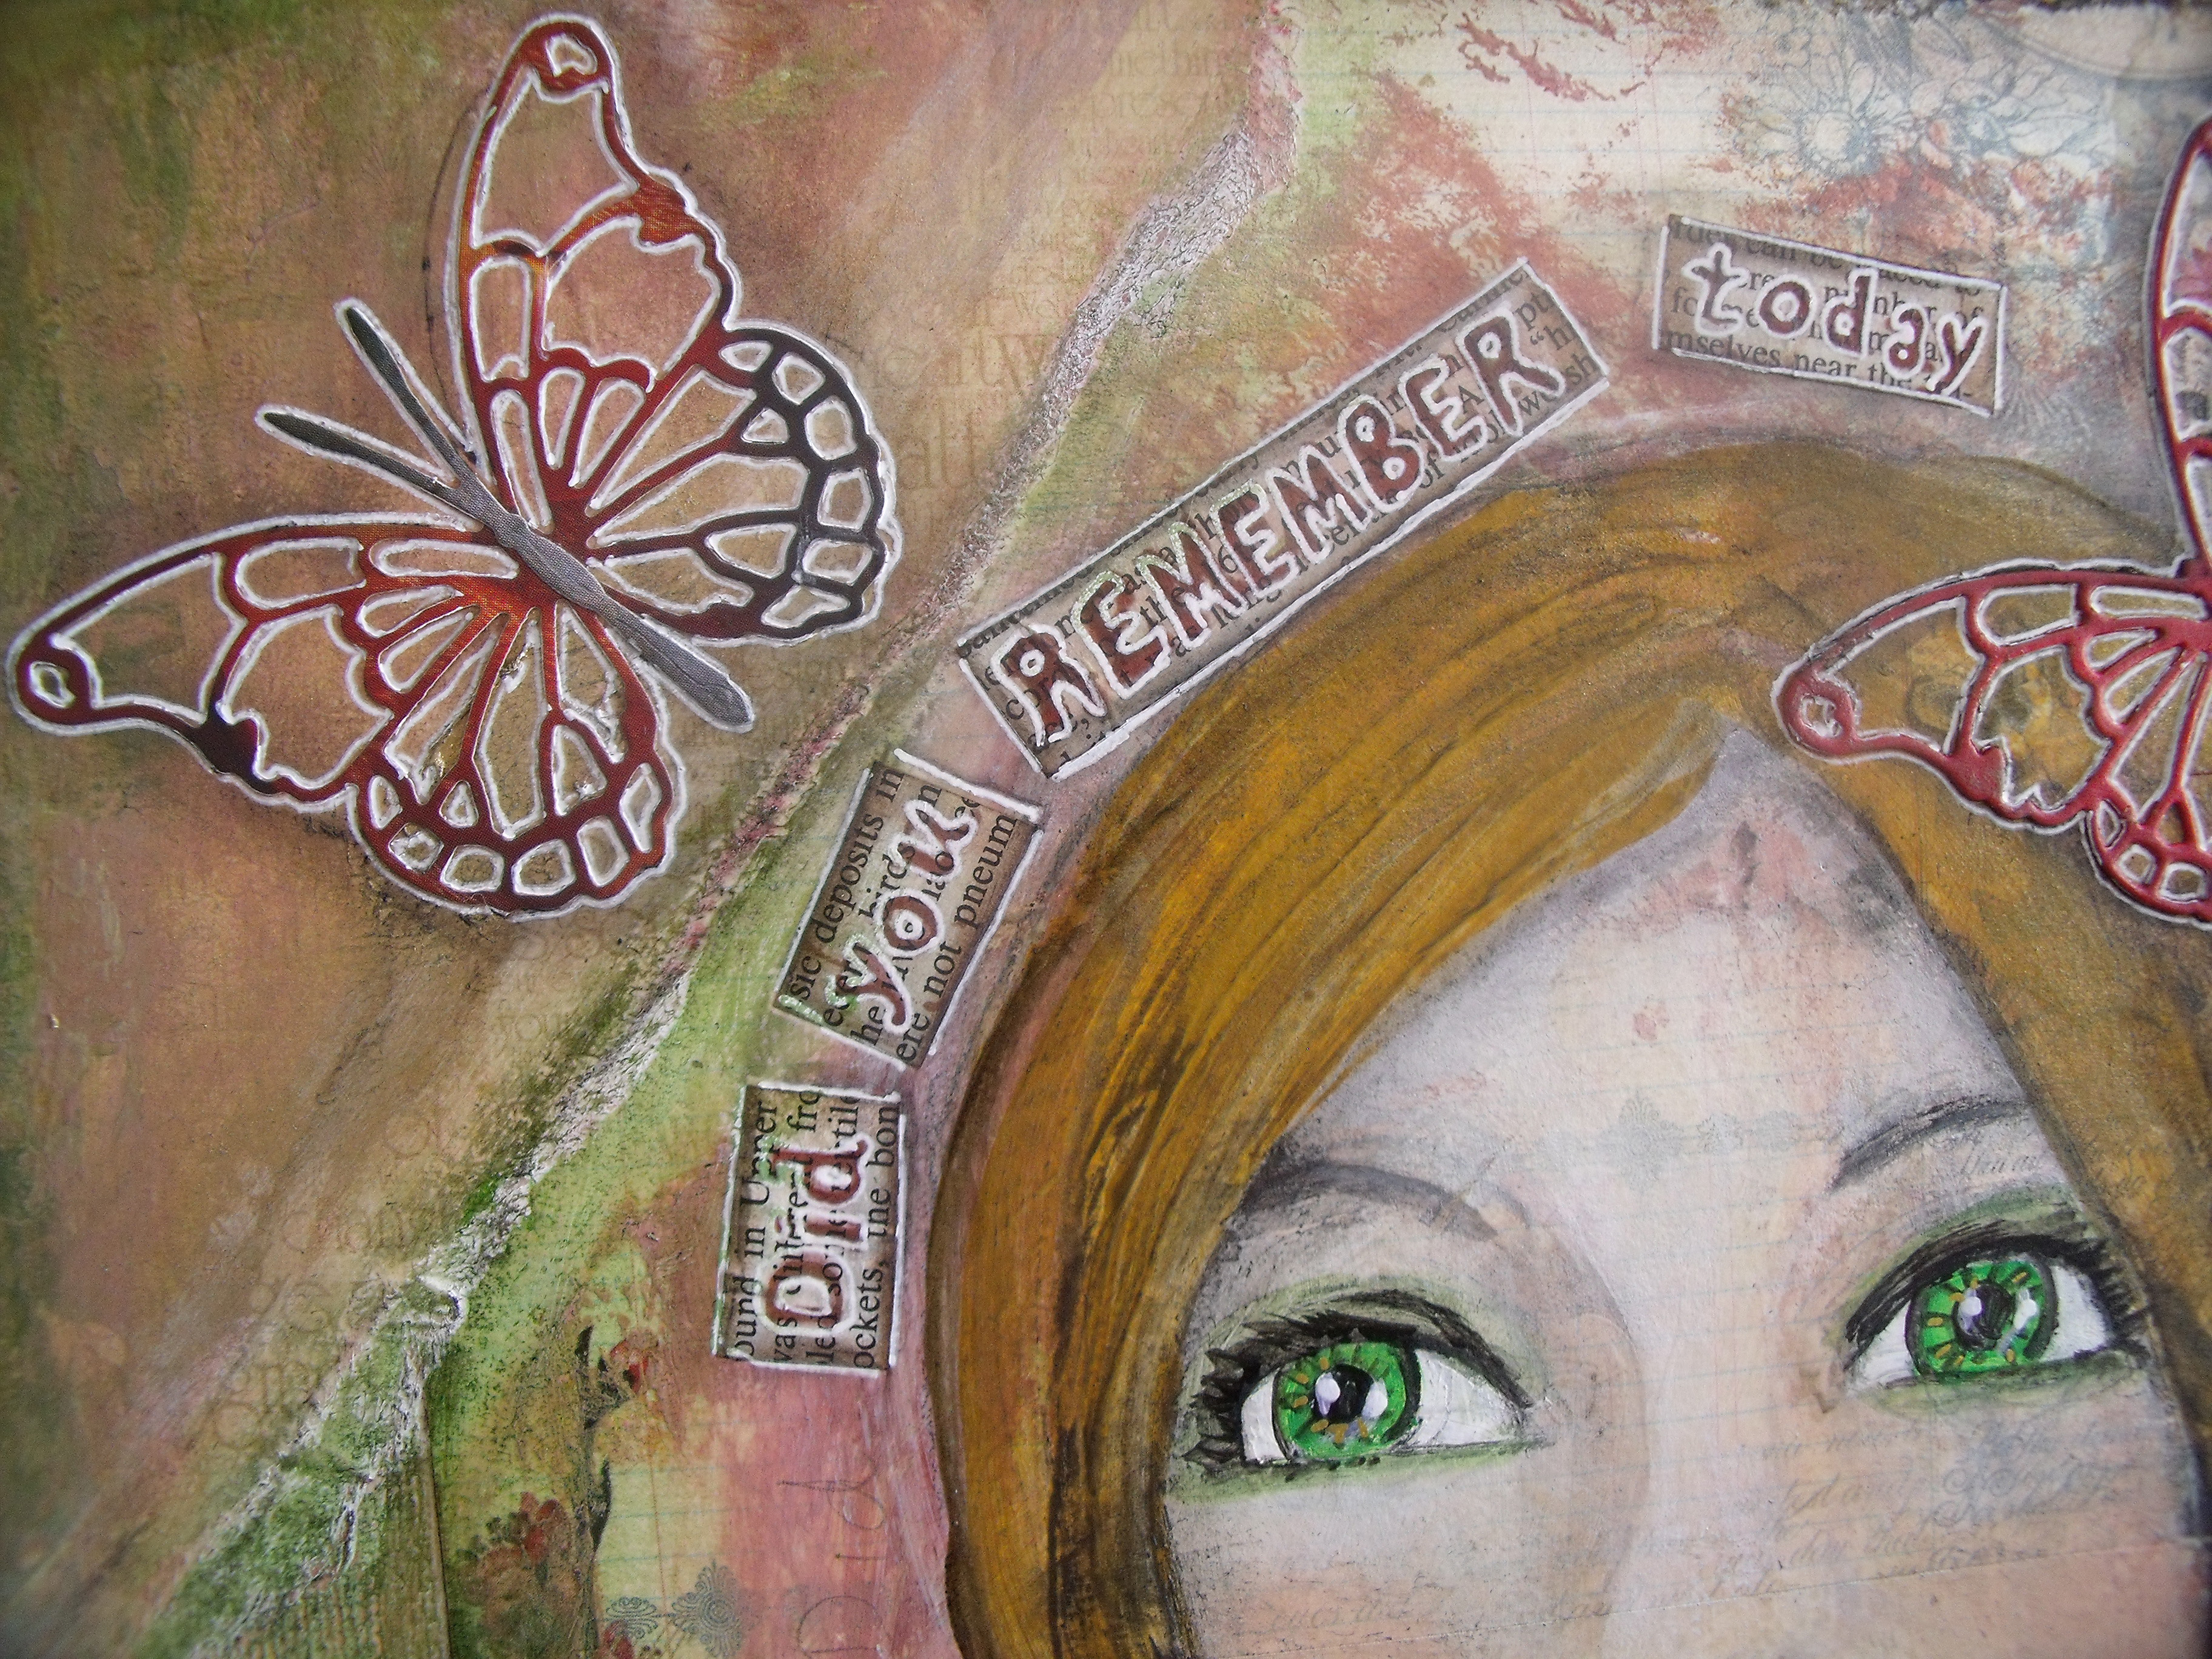
And some detail photos:


That’s my first Christmas gift made and it is still October – well for another 24 hours anyway ….. onwards and upwards!
Thank you so much for coming by today – I love that you did! 🙂
Share this:

Easy Christmas Cards
Here I am again with more cards – what can I say, I’m on a roll!
Before we get to the Christmas card design I thought you might like to see the blue card that was shown in the second photo of the previous post as it is now finished and I’m really excited – I made ‘who-would-know-they-aren’t-really-pewter’ flowers 🙂

What do you think – have I managed to capture it well enough in the photo?
While I was still in the playing around with embossing folders mode of a few days back I also made some Christmas cards – yay me, Christmas in hand already!
I picked up a couple of Tim Holtz Christmas themed embossing folders for a song in a sale early this year. One is no good for me as it features snowflakes and icicles and that is not our Christmas experience – but I liked the old fashioned swirliness of this one:

All I did was matt up the embossed and inked cardstock and then I went over the raised letters with a water based pen. Easy-peasy
Same process with this next one and then I filled in the centrre part with gold metallic pen:

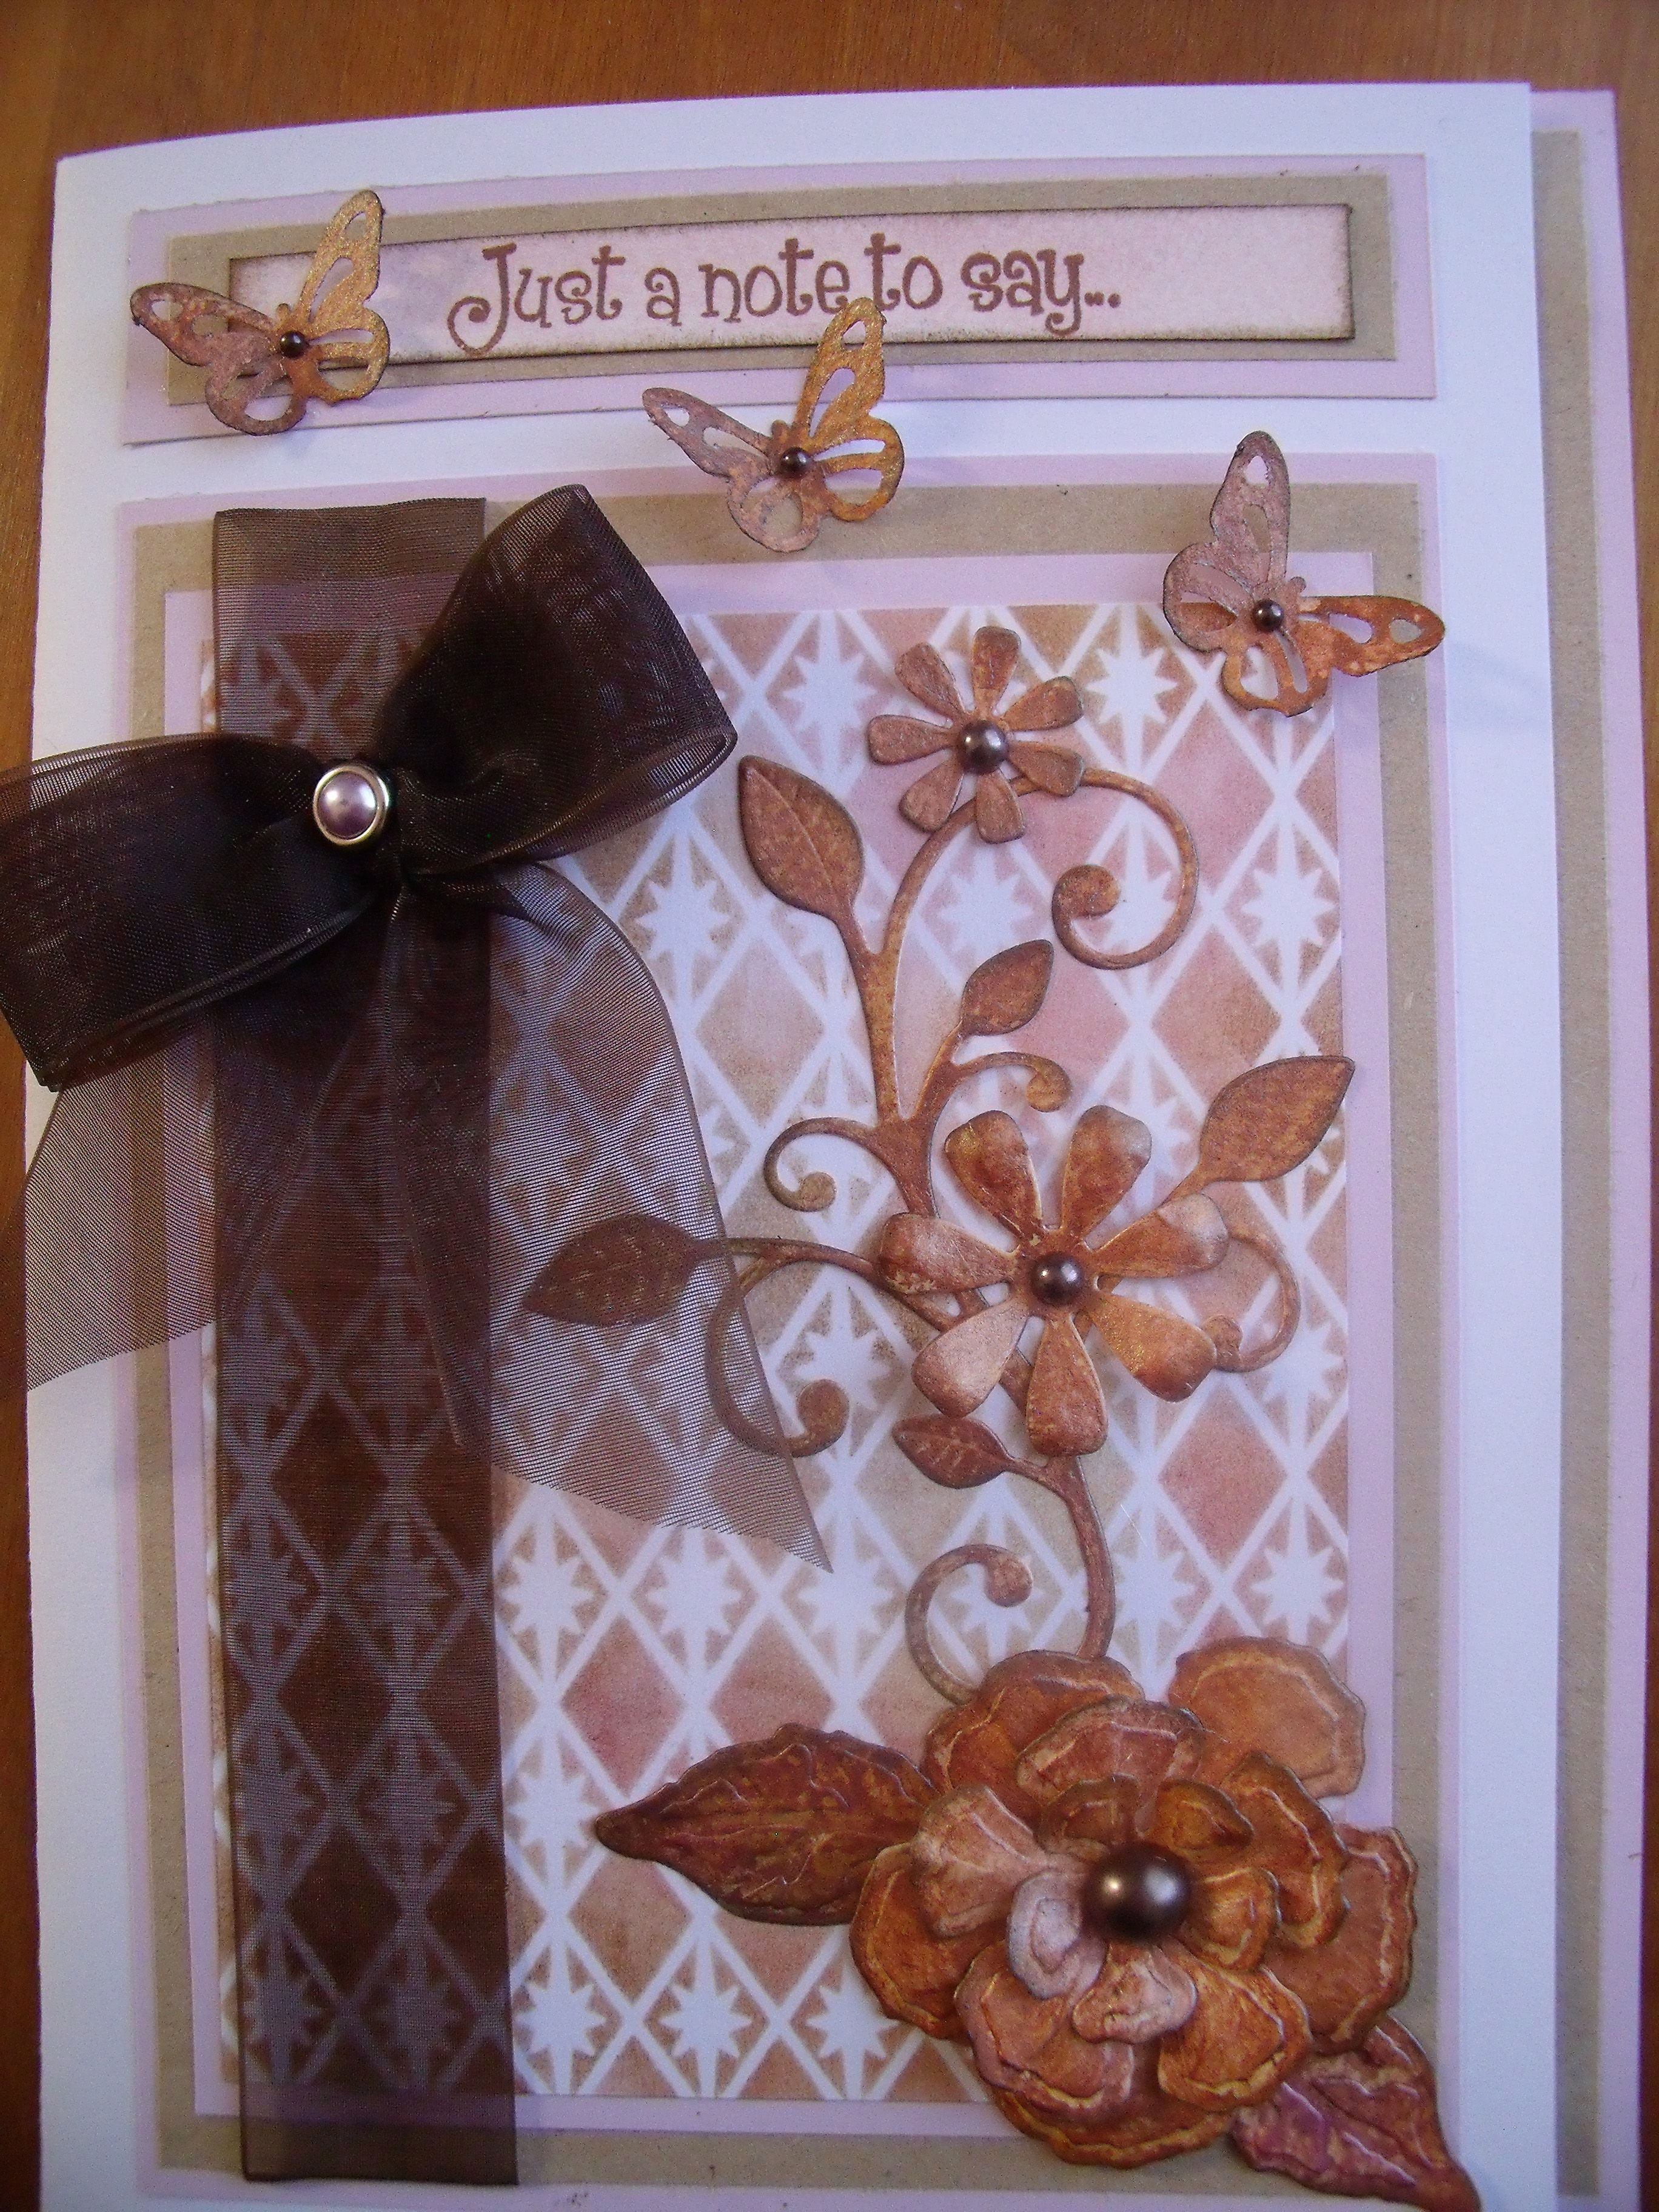
The next two are created using Spellbinders ‘M-Bossibilities’ EL-014 [which gives a lovely deep emboss] on white cardstock. I inked over the raised areas using old paper distress ink in the centre and two shades of green around the edges. The embossed card is matted a total of three times – first to dark green cardstock. The ribbon is attached at the back, the greeting strip is added and then the bow is attached with a brad. When all those bits are in place the second matt was added, I used brown paper on both these cards.
The flowers are another Spellbinders die ‘Poinsettias’ the large leaves were cut from green cardstock and had a good coat of glossy accents spread over them and were left to dry overnight. I dribbled a bit of glittery stuff over the petals when the flowers are made up and hot glued a half pearl in the centre of each one.
The greetings are stickers which are practically idiot proof.
And finally, as there are still dozens of tiny butterflies lying about all over the work table from my enthusiastic experimentation with faux metal I used three on each card as well.

Detail:


More detail:

This is all so easy to do – and makes for highly detailed cards whose only drawback is I can’t make envelopes big enough to contain them! Drats – if you have a recipe I’d love to hear it!
The last two cards are 21 x 15 cm [81/2 x 6″].
Thanks for coming by and having a look, I love that you did 🙂
.
Share this:

Cards with Faux Metal Flowers
The painting is not going well, the lap top is still temperamental and the weather is changeable – it being spring and all – and I have not posted for ten days!
The desk top is buried under a pile of papers and inks and paints and heavens only knows what and I end up working in that little 10 cm square empty spot in the middle:

Now before continuing with my tale I must just fill you in a little more. I am an enthusiastic fan of Vivian Keh, whose blog ‘Contadina K’ is peppered with beautiful and inspiring work and who often makes videos to share her talent. [If you are a card maker and haven’t, you should check her out]
Vivian has been making gorgeous cards [check ’em out here] which kind of inspired me to get out my embossing folders and play around a bit with them – I can’t remember why precisely, but something was kicked off in me and I left her blog and wandered off to the play room and hauled ’em out ………. I didn’t document the process, but all that work can be seen as the background to what comes next……….
On with the story.
If you are a long time reader of this blog you will know that when things are not going well in the arty-farty part of my life I make flowers.
So, I’ve also been making flowers.
This time I played with water soluble pastels and pastel gliders [which are similar to Faber Castell Gelatos] only with a more affordable price point 🙂 I randomly splotched colours all over some 160gms water colour paper and then spread them about with a very wet paintbrush.
See those chopped up bits of paper lower left of the photo, that’s all that is left of those lovely colourful papers I created.
I die cut as many flower and leaf dies as I could fit onto each piece of paper and got a wildly varied collection of colours and patterns – some look really interesting and pretty:

Others not so much:

Some colour ways just did not sit well with the cards I had already begun to prepare for them – using the embossed backgrounds remember – so I got out the ‘Twinking H20’s’ and started playing around to see what happened.
What happened was that as I layered the different colours I began to get a metallic look.
This was exciting and interesting so I forged ahead and made these:

The card on the right is not finished – it is still waiting to be flowered up, but here you can see one of the embossed backgrounds I’ve been wittering on about. The other two are already tucked away safely in their cellophane bags, maybe not so very clear, but you get the idea – yes? And those beautiful backgrounds are really my favourites – more about how they were made a bit later.
Here is the latest card I made, not yet bagged up so let’s have a closer look at it:

I make these cards as durable as I can. They are made from A4 200gsm card and the inside back is given the same matting format as the front which makes it sturdier and able to support the weight of the card front. Here is what the inside looks like:

Lots of space to write your message!
Closeups to show the faux metal look:


I think the above photo shows best the metallic look – the leaves look weighty and see, even the tiny butterfly has a metallic look.
In real life they all do really and truly look as if they are made from metal – this morning I actually had a tinge of disappointment when I picked up a metal looking butterfly [made using the smallest Martha Stewart butterfly punch] and it had no weight to it – and I made the darn thing!
Here’s another flower with a copper look to it:

Once the H20’s have dried I run a darker ink around the edges and some raised parts of the flower and leaves, which gives a more finished look to each piece I think.
This card also has my favourite background – remember those first two cards, here is how they were made. I used two Spellbinders ‘Impressabilities’ – this one called ‘Diamond and Stars’ and the one used at the top of this post called ‘Butterflies’ – as templates and inked through them with three to four different coloured chalk inks. I think the colours are soft and pretty and they work well – Yay, successful backgrounds. 🙂
So that’s what I’ve been up to the past week or so – just playing around to see what happens………………
What do you think?
Thanks for coming by today, I love that you did 🙂
Share this:

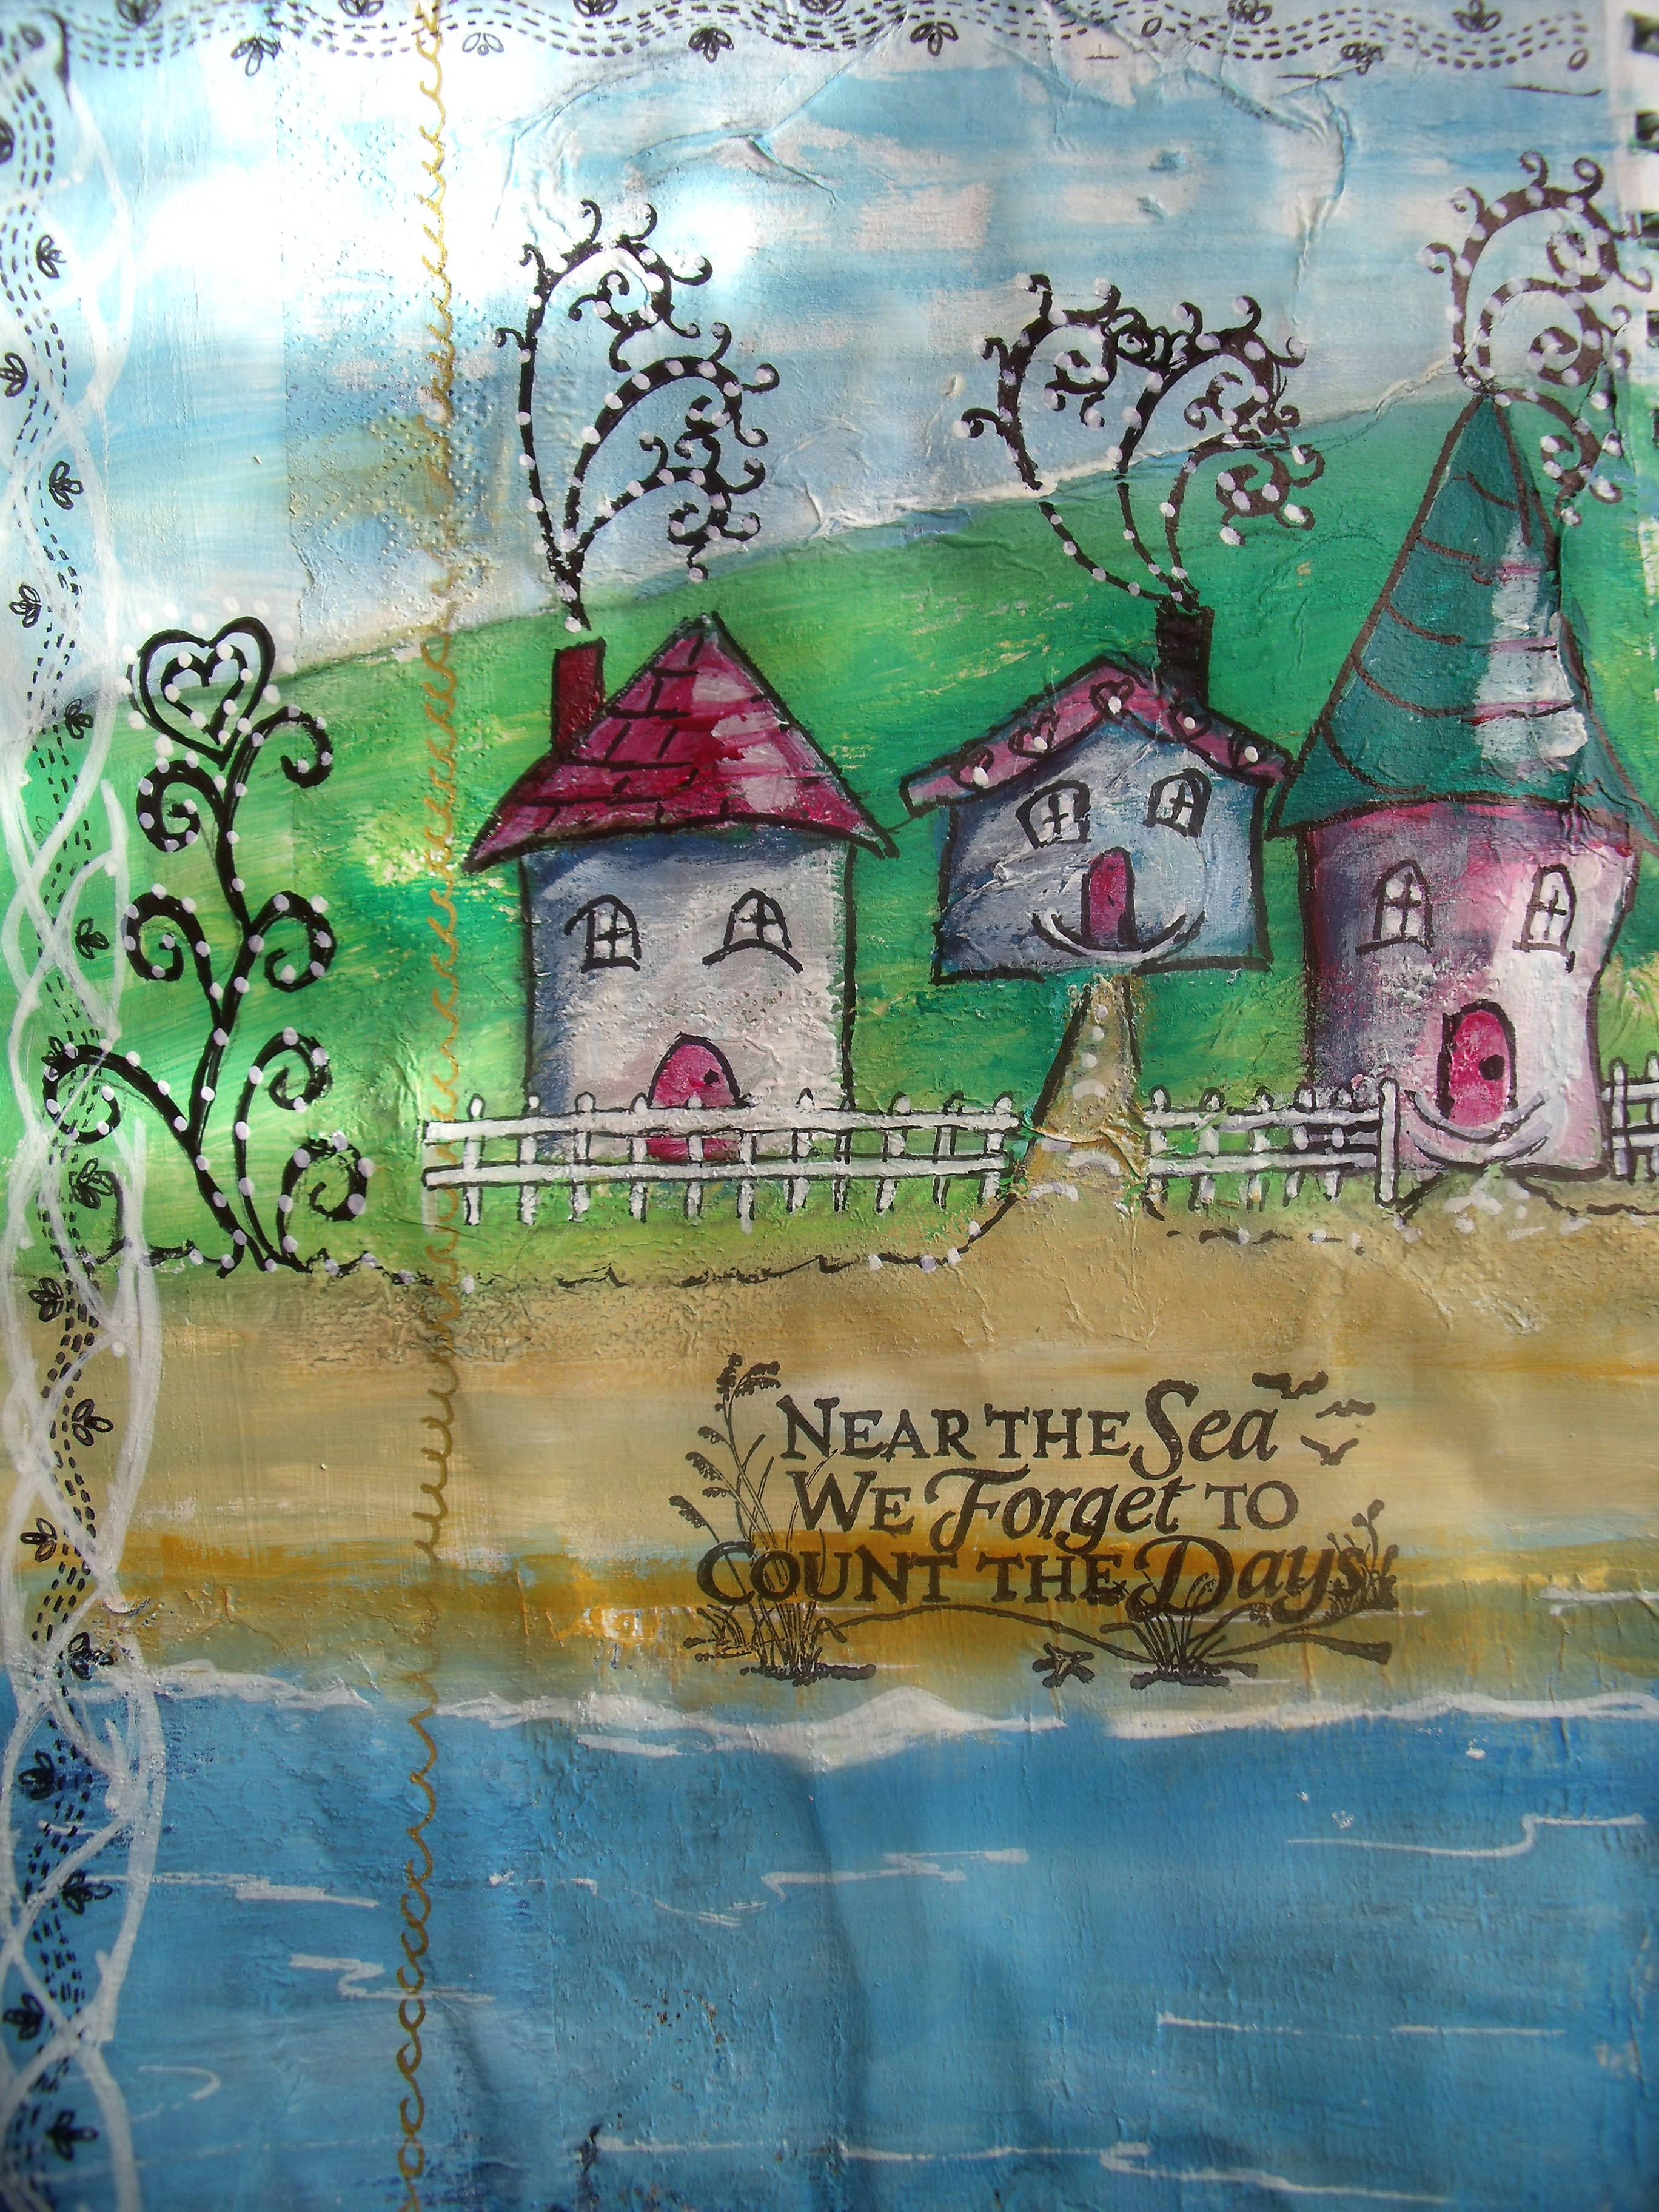
Near The Sea – Art Journal Page
Hello there bloggie friends!
Twice in my life I have lived in a house right beside the sea. Both times I have grown to be more of myself, fed and healed by the salt air, the sights and scents and vitality of the great Pacific Ocean.
There is a yearning in me to live within the sight and sound of the ocean again.
This page is my love song to my cottage by sea.
I started by laying down some serviettes with an ocean theme, then I started painting – the serviettes all but disappeared – leaving only slight texture and a few wrinkles 🙂
So basically this page is done with acrylic paints, charcoal and a Pitt pen or two.


Thanks for coming by and taking a peek – I love that you did! 🙂
Share this:

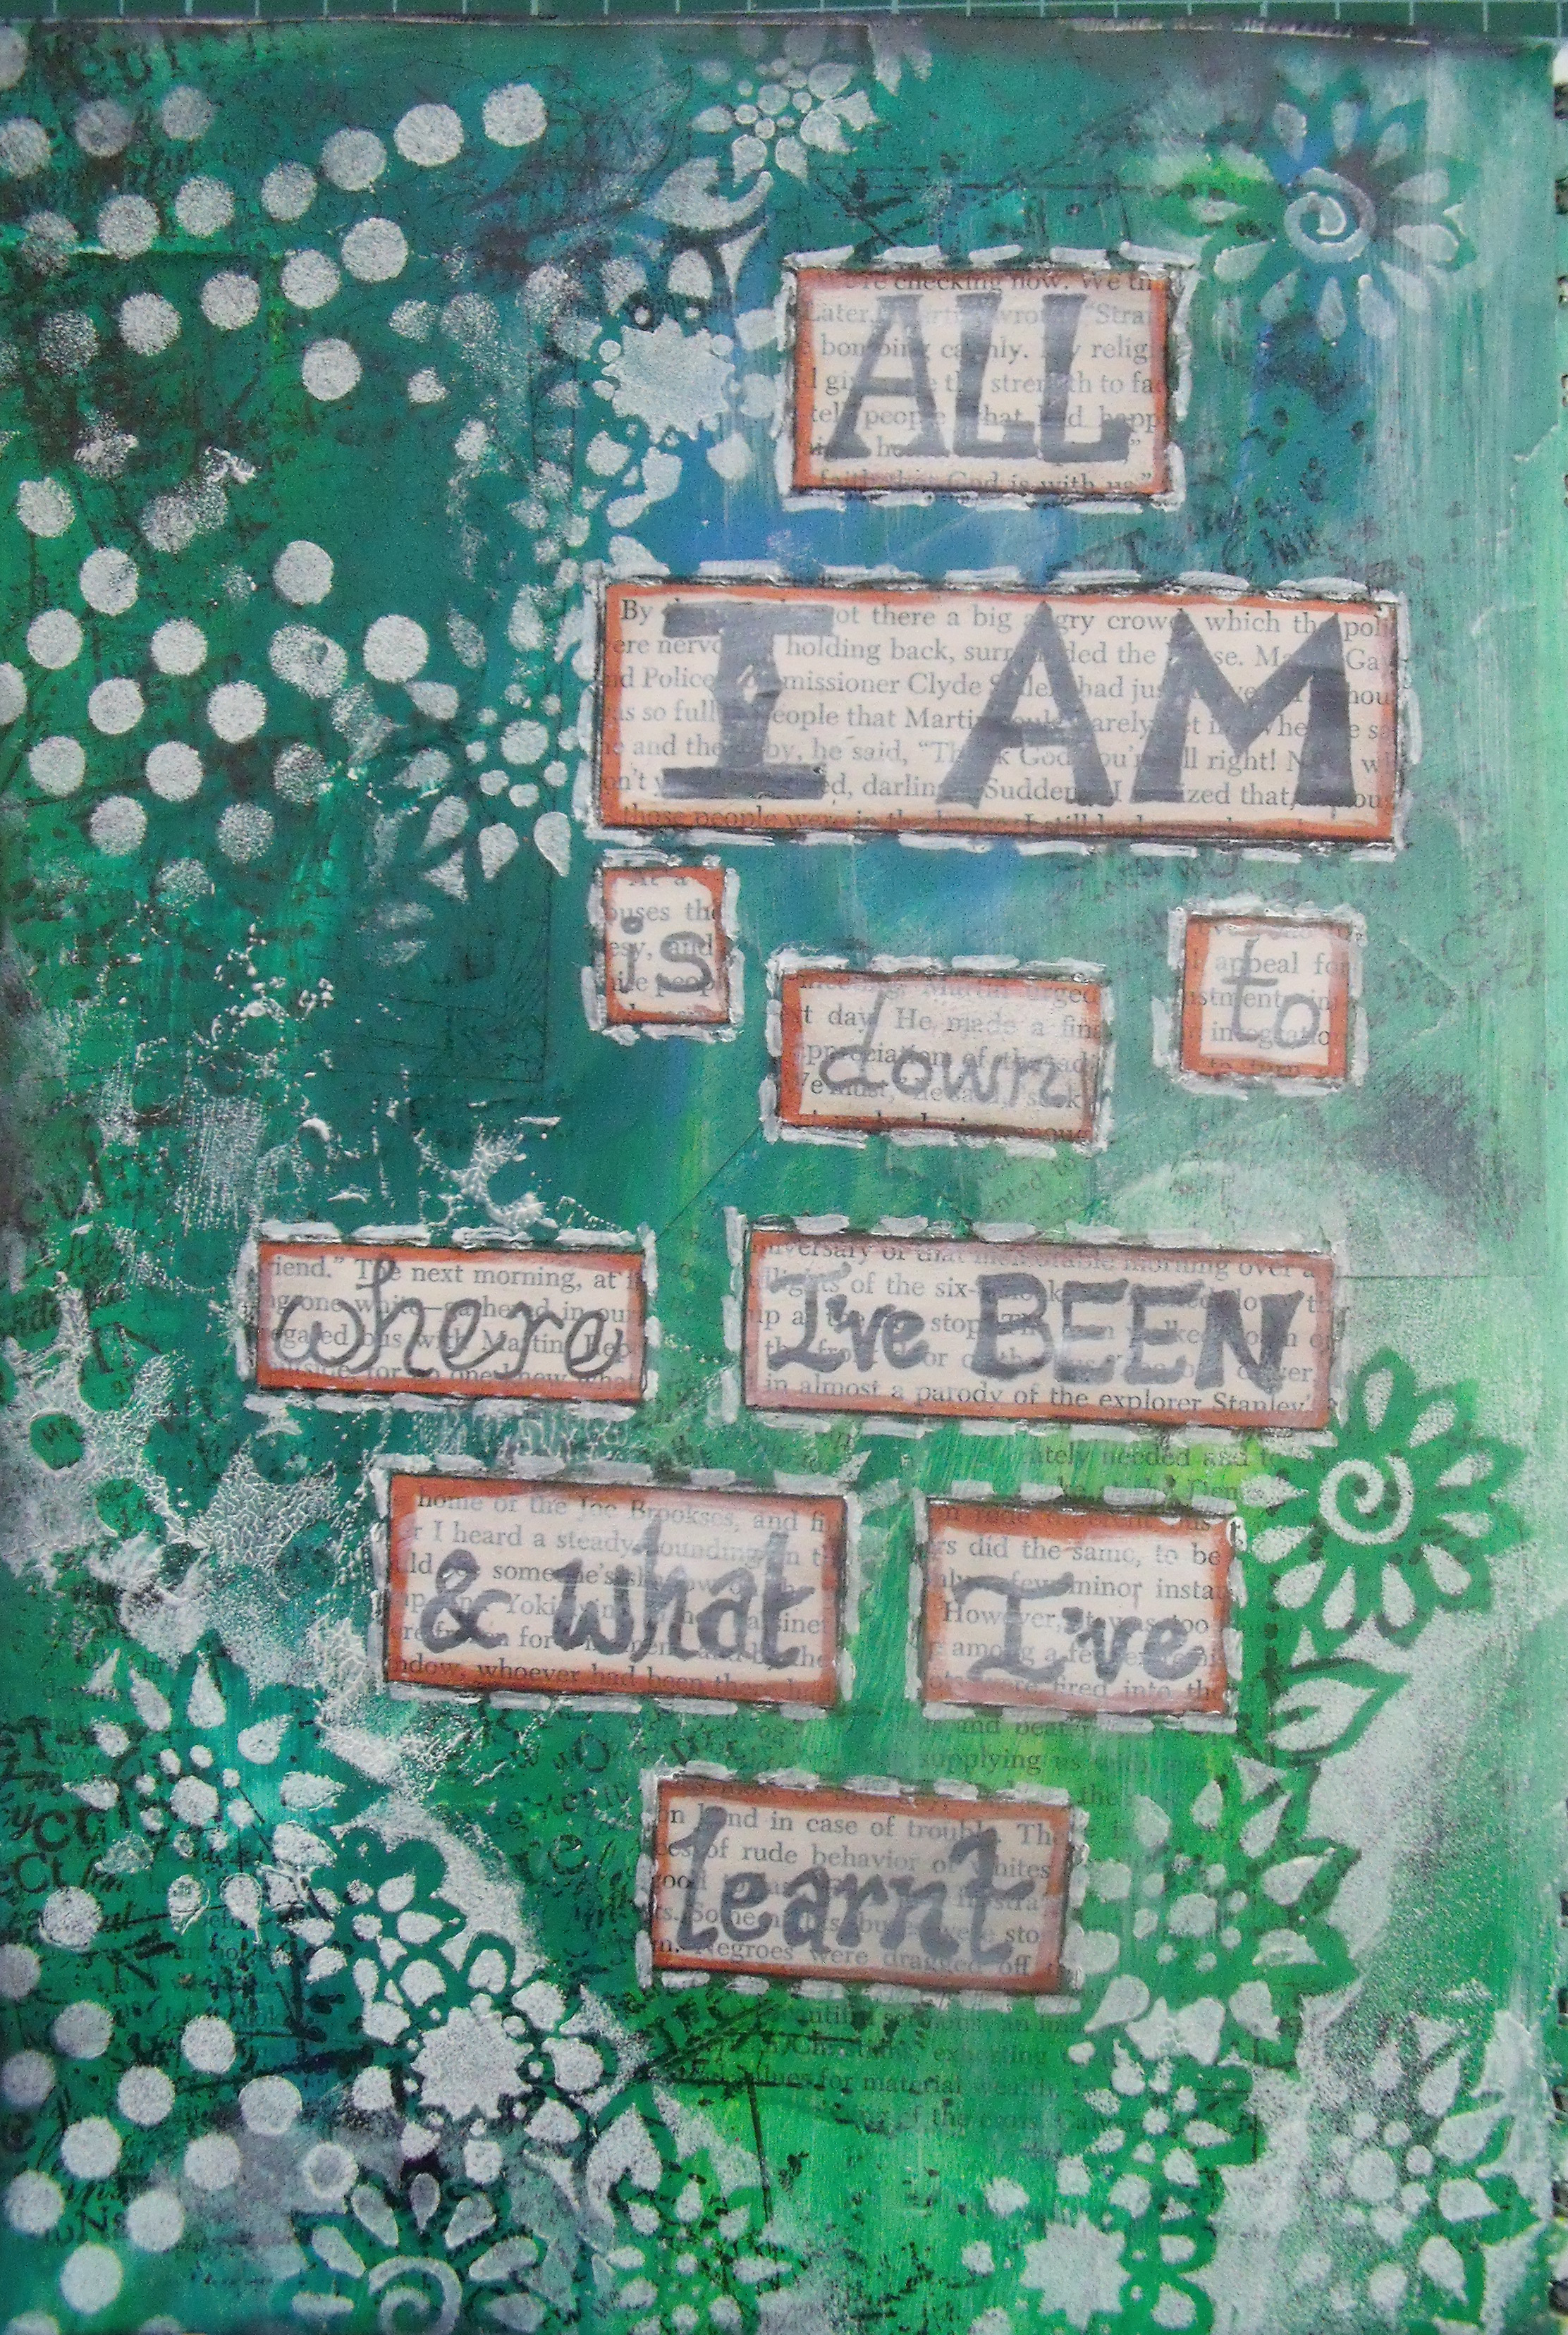
All I Am – Another Art Journal Page
Orlando the Marmalade Cat has been the star of the show for the last three posts, I decided it must be my turn again! And today I decided to work in my art journal again – I haven’t since September 14th [Be the Change …….] My how time flies!!
All I knew when I started was that I wanted to work with my new Monte Marte acrylics, which I’ve had since the end of August and still hadn’t opened. They are beautiful – rich, thick and creamy and as you will see, with a fabulous depth of colour.
I started by laying down some old book pages, which I gessoed over and then I painted.
When the paint was dry I used a couple of acrylic stamps – one with scratchy marks on it and one with words – and randomly plonked them around the pages. Finally a small Dyan Reavelly stencil came into play and I used a dry sponge with almost no gesso on it to dab out the spots and flowers.
With the background done I sketched the head outline in pencil then painted the area white. Once that was dry I could settle in and let the features begin to reveal themselves.
I had three colours on my palette for the face and added in some metallic bronze for the hair – in real life when the light hits the page the hair sparkles 🙂
By the time I had finished painting her the words were clearly in my mind, so I wrote them out onto book paper, cut them out and stuck them in before I could change my mind.

Close-ups for you:

Couple of detail shots:


I love my new paints!
Thanks for coming by today, I love that you did! 🙂
Share this:

Orlando Enjoys A Snack
Hello there 🙂
If you saw the previous post you saw my first attempt at a gif.
It is really just a fast and jerky series of shots with no real sense of continuation – so of course I had another go – I couldn’t possibly let all Boomdee’s good advice go to waste!
This afternoon Orlando was enjoying third breakfast and having a wee chat to me while I cleaned the bench, so I grabbed the camera and clicked away as fast as I could.
Of course he did not play ball and kept looking up to say “Whaddya doing Mama?”
So this is what I got:

What do you think?
Thanks for popping by today – I love that you did!

