
Wow – Inky Doodle Note Cards are proving popular! Thank you, thank you to my loyal supporters who have purchased a set or two I am so thrilled you like them! And yes, it’s true, the no-envelopes choice has been the preferred way to go.
Today I’m showing how I make the promised custom fit envelopes without any special tools. I saw someone do this on YouTube two or three years ago and I’m sorry to say I don’t remember who it was. I already had an envelope template but found it restrictive in sizing. Since learning this method I never used my expensive envelope template again!
Let’s talk about paper first. It’s possible to use any kind of paper. Flimsy paper may need a security insert or to be doubled. You might wish to use matching paper or plain white copy paper. You might want to make your envelope out of deli paper, newspaper, a brown paper bag or fancy pre-printed crafting paper. I’ve used them all and then some.
My friend Alys likes to use her old calendar leaves as envelopes. I’m a bit given to using my paint wiping papers as envelopes. Newspaper is fun, especially if it has a special occasion announcement to accompany the card. If you use newspaper you will need to place a white ‘address label’ on the front of your envelope, as you will need to do with any dark or ornate paper. But anything is possible – we can be as creative as our imaginations will let us be!
So. let’s start.
All you need is your paper of choice, a ruler, pencil, scissors and either glue or double sided tape. Plus the card you are making the envelope for. (I usually make an envelope out of a piece of copy paper to start, just while I remember the steps – then I use the fancy stuff.)
Today I decided to go with a plain mauve heavy weight paper for an inky doodle note card.
Work with the inside of the envelope facing up.

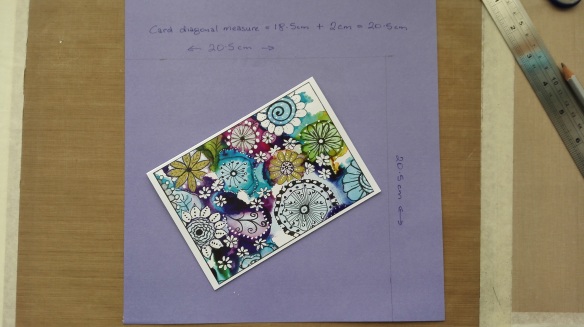
The first thing to do is measure your card diagonally, corner to corner and add 2cm/1″

Cut along the ruled line

Lay the envelope as a diamond in front of you and lay the card long ways across it. The ruler is shown in the photo below to draw your eye to the need to move as accurately as possible the bottom point of the diamond into the same line as the top point as you fold up the bottom of the envelope.

Crease the bottom fold lightly then fold in the sides. Don’t fold in too tightly, you need to be able to slide your card in and out with some ease. But also don’t leave too much space or the envelope simply won’t work out. Crease lightly in case you have to adjust. Once you have made a couple of envelopes this won’t be an issue for you, I promise.

Trim the pointy end of the bottom of the diamond as shown.
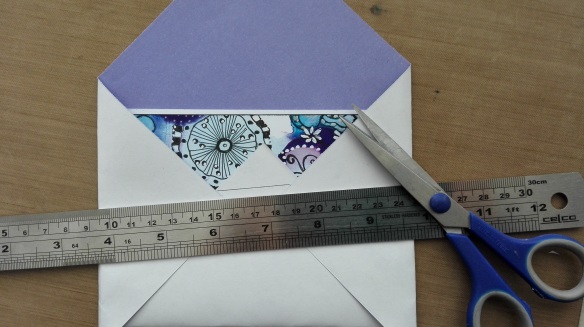
Fold the top over to fit the card. We haven’t glued anything into place yet. If you are happy with the fit

remove the card and open the envelope out. You will trim those little triangle areas as shown, just to make a neater finish to your envelope.


Now use your glue or double sided tape as shown
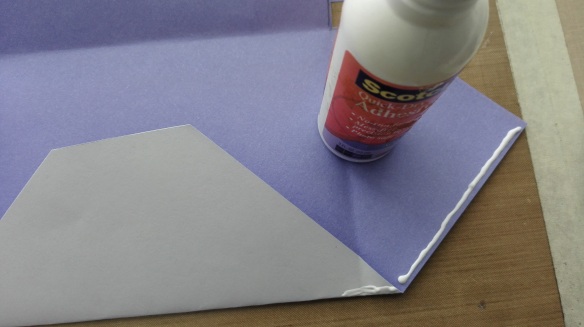

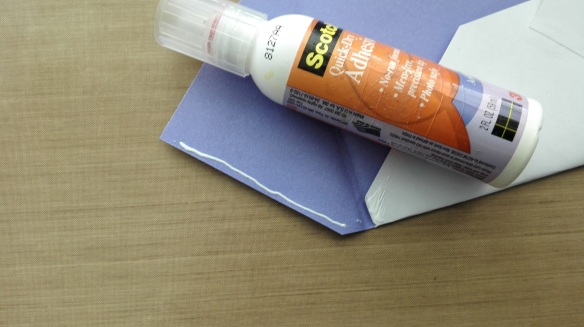
Give the glue a few minutes to dry, then check the card fits in nicely.

As a finishing touch you can use this stuff to put a proper sticky edge to your envelope – or just tape down with sellotape or a fancier decorative tape if you have that to hand.

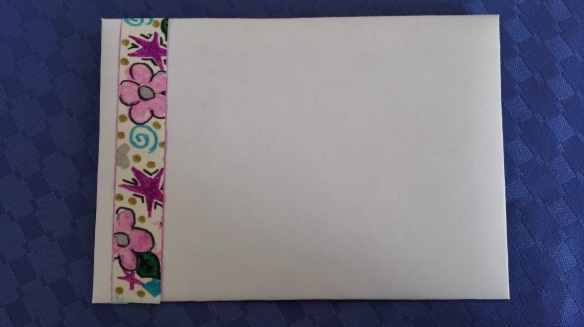
I added a strip of my own decorative tape to the front, left side of the envelope and voila!! One custom fit envelope that took me twenty minutes to make with posing and photographing but less than five in ordinary circumstances.
If you would like the opportunity to receive this card and envelope with a hand written letter from me please mention it in your comment and if there’s more than one I’ll do a draw and use that random choice thingy if I can find it. 🙂
Please do let me know if anything isn’t clear.
And if you make your own envelope, let me know how it turned out.
Thanks for coming by today, I love that you did!


I will have to have a go. I like Alys’ idea of using old calendars. (I have many of those!)
LikeLike
So I’m going backwards in time today, having visited Lisa’s blog first, then your reblogging of it, and now here.
Did I tell you that my cards arrived? They are so pretty and my intent to frame them for my wall was challenged by my desire to share them. I’m thinking I’ll just have to order more!
LikeLike
I like this tutorial. Thank you!
LikeLike
Thanks for coming by Cynthia – glad you like it 🙂
LikeLike
Pauline, I used to make handmade notes and envelopes often. This year I did homemade Valentine’s cards. ❤ Nothing as decorative and artistic as yours, dear.
I am sure I missed the deadline but someday it would be nice to send each other a homemade card! xo hugs to you and the snuggly Siddy and observant Orlando.
LikeLike
Handmade cards are the best, whenever we can make them I think. I have all the time in the world these days, but still often miss important events and end up sending e-cards. Working a full time job and making cards for every important event would be impossible! I haven’t done the draw yet, I have had family visiting and the days are very full – so you never know what might happen 🙂 xo
LikeLike
OMG that is so neat!! I had no idea you could do that and I want to try that:-) I Love your banner with your artwork above. I love the new inks!!!!!!!
LikeLike
It’s an easy and effective way to make an envelope Robbie – pleased you like it and will do it 🙂 xoxo
LikeLiked by 1 person
Very helpful, thanks.
LikeLike
Glad to be of help! 🙂
LikeLike
I can’t believe you made these without Siddi’s help.
LikeLike
I know Frank – Siddy finds it hard to believe also 🙂
LikeLiked by 2 people
Hi Pauline! Great to see you so busy, but I’m so sorry I’ve missed a few of your posts 😦 I was determined to visit you no matter what this week though…lovely to see you as always 🙂 I used to love arts and crafts, particularly when the children were little. But I’ve never made my own envelopes, what a great idea. Unfortunately though, I can’t see any of the images, only numbers in boxes. No idea why. And I would absolutely love, love, love to receive a hand written note from you in one of your envelopes! I love snail mail, get so little of it these days. And to think, it’s what kept me going when I lived in America all those years, sans internet or email. They were the days my friend! 🙂 ❤ xoxo
LikeLike
Thank you for the heads up Sherri, I have fixed the problem. I’m doubly glad you came by! It is always lovely to see you and hear from you. It is nice that the interest in writing letters is reviving somewhat – I too remember the time when letter writing was an essential part of every week and checking the mail box was a pleasure 🙂 I have to do a draw for the handwritten note, good luck 🙂
LikeLiked by 1 person
Ahh…that’s better, now I can see your lovely photos, thanks Pauline! I am a visual person for sure, once I can see something, it all makes sense, especially with your easy to follow directions 🙂 I don’t usually win draws…but I’m keeping everything crossed that I can, ha! 🙂 xxx
LikeLike
I’m unable to get the images to show which is more than likely related to my lousy internet connection this morning (it’s cloudy outside and satellite doesn’t work well on cloudy days). I’ve bookmarked this so I can back and give this a whirl. I’ve been wanting to send cards to my grandchildren and would love to be able to make the envelopes as well as the cards.
Thank you for sharing your expertise with us. I’ll let you know how it goes. 🙂
LikeLike
Hope you get the pictures soon Robin. I’m very pleased to hear you will make envelopes to go with your cards. The grandkids will be knocked over by your cleverness! 🙂 I’ll look forward to hearing how you get on following the recipe.
LikeLike
Robin, there was a glitch with my photo menu which has now been fixed so photos should be there now.
LikeLiked by 1 person
That’s much better. Thank you for letting me know, Pauline. I was trying not to curse my internet service provider. lol!
LikeLike
Sorry about that 🙂
LikeLike
Good tutorial! You explained beautifully and I certainly will use this! And of course we all hope to win a note from you on one of your special cards!
LikeLike
I’m pleased to be spreading the recipe about Kerry and super glad you will use it! I think you are #4 wanting the letter, so it will be a draw. I must go find that random selector thing now….
LikeLike
You are so clever, Pauline. You’ve written a clear and concise tutorial. I went the lazy route and bought a series of templates at an art store several years ago. I just trace. 😉 I do love turning random things into envelopes. I once received a high end fashion catalog with gorgeous photography that I saved and used for years. I only received the one catalog. I guess they figured out I wasn’t going to shell out $500 for a blouse!
I’m so excited to see the cards in person. It sounds like you’ll be keeping the NZ post office humming in your neighborhood. Weeeeeeeee…
xo
LikeLiked by 1 person
Well, now you know how to do it if ever you get an odd sized card that doesn’t fit your envelopes. And this has just reminded me that I sent your package off yesterday and didn’t include envelopes – I completely forgot you wanted them! I guess there will be another trip to the post office for me tomorrow 🙂
LikeLike
Oh, please don’t make another trip. It’s four days since this comment, so perhaps you have. But if not, you know that I know how to make them. 🙂
LikeLike
Alys, I hadn’t sent them! It completely slipped my mind with all the other excitement and Jo being here for the week Maybe you have your package by now? I am still happy to pop some in the mail if required, just say! I love my bag!! ❤
LikeLike
I love your bag too. And my scarf. Finally got some photos to post, share and send. xo
LikeLiked by 1 person
I’m sure you will make it look stunning! xo
LikeLike
xo
LikeLike
Very clever, you are so resourceful!
LikeLike
Thank you – some would say I’m just cheap! 😀
LikeLiked by 1 person
I say innovative, and frugal makes it even better!
LikeLike
😀
LikeLiked by 1 person
Remoistenable envelope glue? Who knew there was such a thing! I would love the chance to win this gorgeous creation please:)
LikeLike
I know! The craft world seems to come up with everything doesn’t it. I’ve had this for ages and rarely use it 🙂 Going to do a draw for the card and envelope, good luck!
LikeLiked by 1 person
Great workshop post! Your explanation is easy to follow and the decorative strip is a perfect addition. Lovely Jubbly😄
LikeLike
Fab feedback, thanks Jenny! 🙂
LikeLiked by 1 person
You’re welcome!
LikeLiked by 1 person
Brilliant tutorial Ms Pauline. I would love a chance at winning your beautiful inky doodle card and perfect custom envelope. I saved you to Pinterest so anyone else wanting to know how to make their own custom envelopes can head straight over without passing “Go” or having to pay $200 🙂
LikeLike
Oh darn it Narfie I was counting on the $200 😀
Thank you for saving me to Pinterest that is just lovely. (I don’t go there any more.) That’s 2 Aussies who want to have a handwritten note from me 🙂 Let’s see what happens…..
LikeLiked by 1 person
Knock yourself our Ms Pauline. Feel free to have the $200 for passing go and you can even have my $200 for passing go if you like. Thats a nice big virtual $400 for you ;).
LikeLike
There we go – you are all virtual heart! 😀
LikeLiked by 1 person
❤
LikeLiked by 1 person
This is very useful as sometimes I find a particularly charming unused vintage card with no envelope. The tutorial is very clear and well written. Most of all the envelope and the card are perfect for an important and heartfelt correspondence.
LikeLike
Thank you Ginene. It would be wonderful if you can source some suitably vintage looking paper and make envelopes for your old cards. And yes, ‘heartfelt’ correspondence – lovely!
LikeLiked by 1 person
Having had a problem with commercially made cards, I particularly like the warning about making it too tight.
LikeLike
It’s a universal problem Derrick 🙂
LikeLiked by 1 person
You make it look so easy, Pauline. I have a feeling I’d mess it up. I love the strip of decorative tape .That’s so you! Thanks for sharing.
LikeLike
Ah Jill, you might surprise yourself. 🙂 Thanks for so loyally coming by any how xo
LikeLiked by 1 person
It always brightens my day. ❤
LikeLiked by 1 person
❤
LikeLiked by 1 person
Thank you for a great tutorial!! xo Johanna
LikeLike
Most welcome Johanna xo
LikeLiked by 1 person
Thank you for sharing your marvelous envelope-making secrets, Pauline. I like the way you can custom-fit it to any card you make. I had one of those envelope templates too, but they made just one size. The envelope you made is beautiful and I would treasure a hand-written note received inside it!
LikeLike
Thank you Norah – I thought nobody would want a note from me 🙂 Is it different to the way you make them?
LikeLiked by 1 person
I always love hearing from you, Pauline. 🙂 I think it’s basically the same. I haven’t pulled out my template or pattern yet, but yours is so easy to follow. I love your clear instructions and steps shown in photographs. I love the additional touches and your “remoistenable envelope glue”. I haven’t seen that before. Interesting. Thanks. 🙂
LikeLiked by 1 person
I love the idea of matching my envelope to my card and the little trim is a cute idea. Thanks, Pauline.
LikeLike
You are welcome Carol! It makes the card special if we can do that, yes?
LikeLiked by 1 person
It’s a beautiful personal touch.
LikeLiked by 1 person
Thank you. A great tutorial and, as I sit here full of cold feeling a little sorry for myself, rather comfortingly as I rather feel like I’m ‘watching’ Blue Peter (assume you know Blue Peter in your part of the world). Thank you.
LikeLike
Awful things colds! I’ve heard of Blue Peter but don’t really know who he is. Make real chicken soup and cold will go away 🙂
LikeLiked by 1 person
Blue Peter was TV program where they used to have a crafty making section. Didn’t make any chicken soup, but feeling a lot better than I was 🙂
LikeLike
Good to hear that Bekki. I always loved TV shows that made things when my kids were young – I’d be in there too having a go 😉
LikeLiked by 1 person
Thank you for the walk through, Pauline! I can do this! 😀 ❤
LikeLike
Yes you can!! 🙂
LikeLiked by 1 person
No one need know how many pieces of paper I throw away until I master this!
LikeLiked by 2 people
This is true 🙂 And you might be surprised at how few pieces of paper you need to practise on……
LikeLiked by 1 person
You make it look so easy. Bet I don’t. 🙂 But I’ll give it a try. Thanks for sharing it.
LikeLiked by 1 person
Oh do give it a try Marlene – it’s like everything, the more we do something the easier it gets and you have nimble fingers to start with! Have fun! And don’t forget to let me know how you do.
LikeLiked by 1 person
Will do.
LikeLiked by 1 person
Very handy thanks Pauline.
xxx Massive Hugs xxx
LikeLike
Thanks David 🙂 xoxo
LikeLike
I think I can do this! It will give me an excuse to by colored paper. I’m fanatising about construction paper…
LikeLike
Of course you can do it!! Construction paper works well. Play with cheap printing paper or newspaper first, just to get the hang of it and off you go. Have fun 🙂
LikeLiked by 1 person
I will. Very excited about getting the cards. I’ll probably just make a pattern and then use the colored paper.
LikeLiked by 1 person
So easy even I….
LikeLike
Yes Geoff, even you. Dare! 😀
LikeLiked by 1 person